


Cloud computing is a revolutionary concept that leverages a network of servers to deliver a wide range of services and resources over the Internet. Common cloud services offered are data storage, data security, and data management. Major tech companies such as Amazon, Google, and Microsoft offer a centralized cloud-based infrastructure, enabling users to scale their IT resources as needed. The tutorials below provide tips and tricks on how to get started with cloud computing.
Deploying a Static Site with Netlify
Learn how to easily deploy a static site through Netlify’s GitHub integration.
Deploying a static site
If you want to share a site that doesn’t have a backend and provides the same information to all visitors, then deploying a static site would be perfect. As you know, the most efficient way to deploy these static sites is through Netlify.
To do so, you’ll need to have the following:
- A Netlify account, which can be created step-by-step in “Getting Started with Netlify”.
- A GitHub account that you’ll be using to fork an existing repository. If you don’t know how to fork a repository, check out our course on GitHub.
Forking the repository
For the purpose of this article, we’ll be using Codecademy’s “deploying-a-static-site-with-netlify-sample” repository. You can use your own repository if you wish, but you’ll have to modify the following steps accordingly.
To fork the repository to your personal GitHub account, click the Fork button on the original repository’s page:

You should then have your own copy of the “deploying-a-static-site-with-netlify-sample” repository, which you’ll soon deploy.
Using Netlify
Let’s get started with deploying the GitHub repository — it only takes a few simple steps! First, make sure you’re logged in to your Netlify account and then go to your dashboard.
Creating a site from Git

In your Netlify dashboard, click New site from Git to start the deployment process. You’ll be directed to a page that shows the first step, which is connecting to your Git provider:

You should select the GitHub option because that is where your forked repository is hosted. However, GitLab and Bitbucket are available if you want to use those for other projects.

If you didn’t create your Netlify account using GitHub, you’ll need to provide connection permissions by clicking Authorize Netlify. Doing so will eventually allow Netlify to connect with the GitHub repository that you want to deploy.
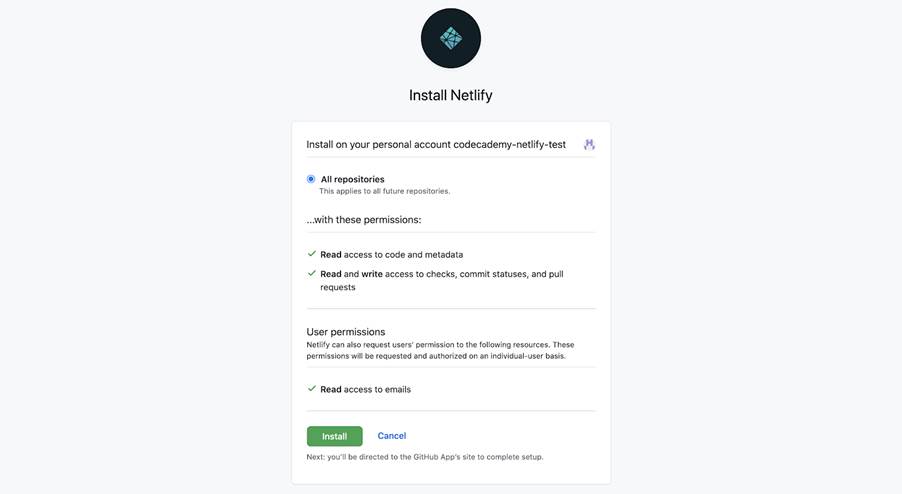
You also need to install Netlify to your GitHub account by clicking Install. Note that you may have to enter your GitHub password again.
If you successfully connected your GitHub account to Netlify, you should see your GitHub username and forked “deploying-a-static-site-with-netlify-sample” repository under “Continuous Deployment: GitHub App”, somewhat like:
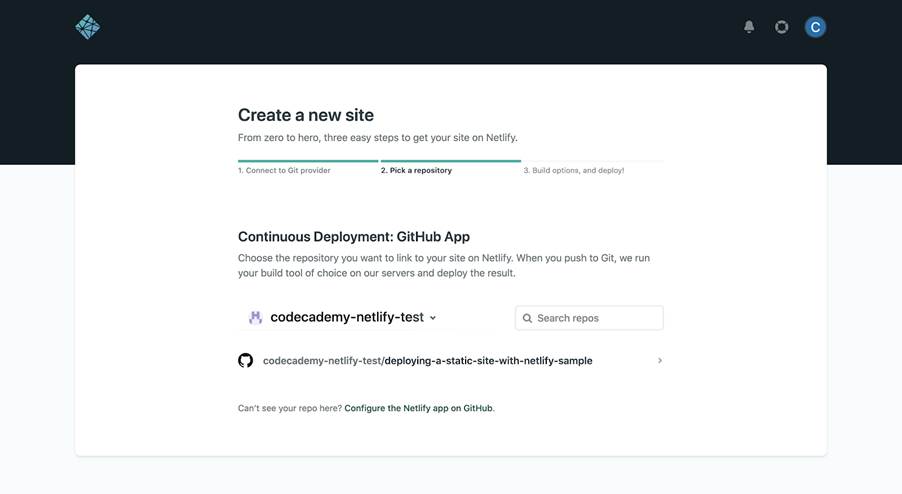
Choose the “deploying-a-static-site-with-netlify-sample“ repository to link it with Netlify.
In the next step, check that the “Owner” dropdown is set to the correct team (your Netlify account name in this case) and “Branch to deploy” is set to main, like:

Scrolling down, you’ll see options for “Basic build settings”:

Regarding the “Build command” and “Publish directory”, note the following:
- Because this is an HTML, CSS, and JavaScript build, there is no need for build commands, which are instructions that Netlify uses to build certain types of sites like those from frontend frameworks and static site generators.
- Since no build commands are used for this site, you also don’t need a publish directory, which would contain deploy-ready HTML files and assets generated by the build.
You’re now ready to deploy, so click Deploy site! You’ll then be directed to the site’s dashboard:

The build status should continue to show “Site deploy in progress” and “Deploying your site” until the site has been successfully deployed. At that point, the status will change to “Your site is deployed” and you’ll see a link to your deployed site:

Click the link, and you’ll be directed to your deployed site:

Notice that the page’s background color changes every time you click the 👏 (clap) button!
Production deploys
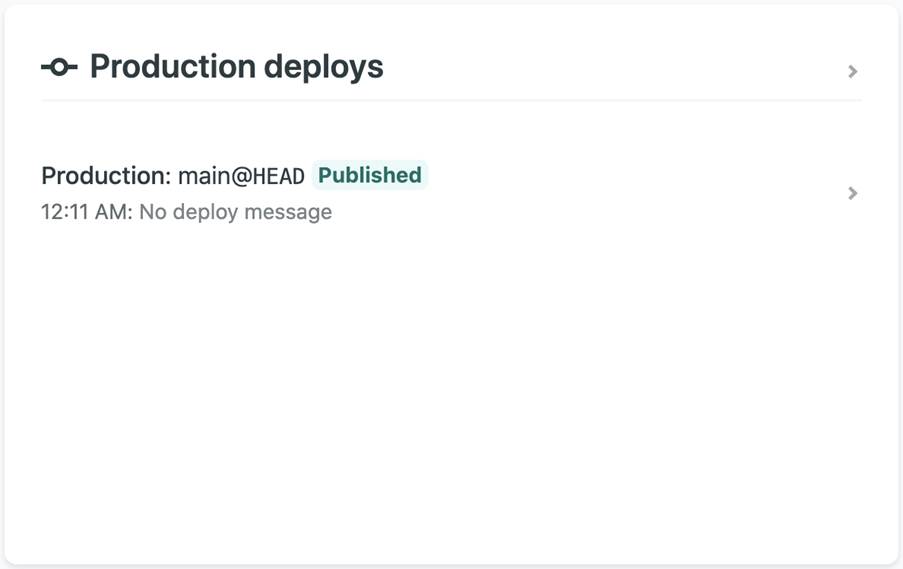
You can check the ongoing log that contains in-depth information about the site’s build status, which is especially useful for debugging any errors that may arise. To see these logs, scroll down to the “Production deploys” section of the Site overview tab:
Analyzing the logs
In the logs, you should specifically look for “Published” or “Failed” statuses:
- A “Published” status means that your site has been successfully deployed.
- A “Failed” status means that something went wrong in the deployment process.
Since every project is unique, the best way to fix a “Failed” deployment is to either google the error or browse through Netlify’s documentation. With that being said, you may find the following resources from Netlify to be helpful:
- Build troubleshooting tips
- Netlify Community forum
- Frequently encountered problems during builds guide
Making changes to the site
Next, select the Deploys tab located at the top of the site dashboard:
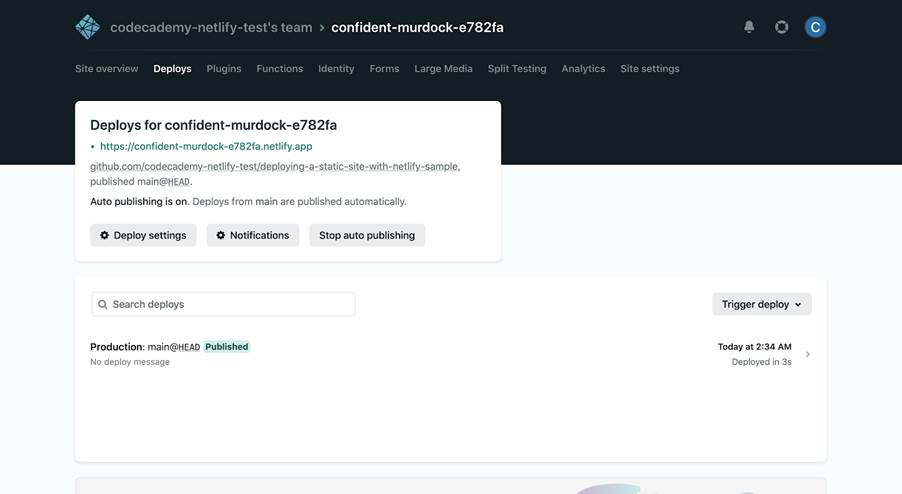
Notice that “Auto publishing is on”, meaning that your site automatically deploys each time you push a commit on GitHub (continuous deployment). Although not recommended, you can turn this setting off by clicking Stop auto publishing.
To make changes to your site, update your forked GitHub repository. Here’s a simple example for changing the site’s heading (note that these steps are specific to the GitHub website interface):
- Navigate back to your forked “deploying-a-static-site-with-netlify-sample” repository and make an edit to the <h1> text (e.g., you could change the text inside the <h1> element from “Welcome to your website!” to “Welcome to Jane’s website!”).
- Commit your changes and wait a few moments for Netlify to update the build.
- Like before, you can monitor the build status through the site’s dashboard in your Netlify account.
- After the build is complete, you should notice a difference in your published site’s heading — it’s that easy to make changes to your Netlify site!
Site settings
Let’s now explore the Site settings tab, also at the top of the site dashboard:
Changing the site name
Notice that the name of your site is randomly generated by Netlify. To rename your site to something more appropriate, click the Change site name button located in the “Site information” panel. From there, you can Save a new unique name, which also determines the site’s default URL, like so:

Build settings
Next, click the Build & deploy tab on the left to see even more settings that you can manipulate:
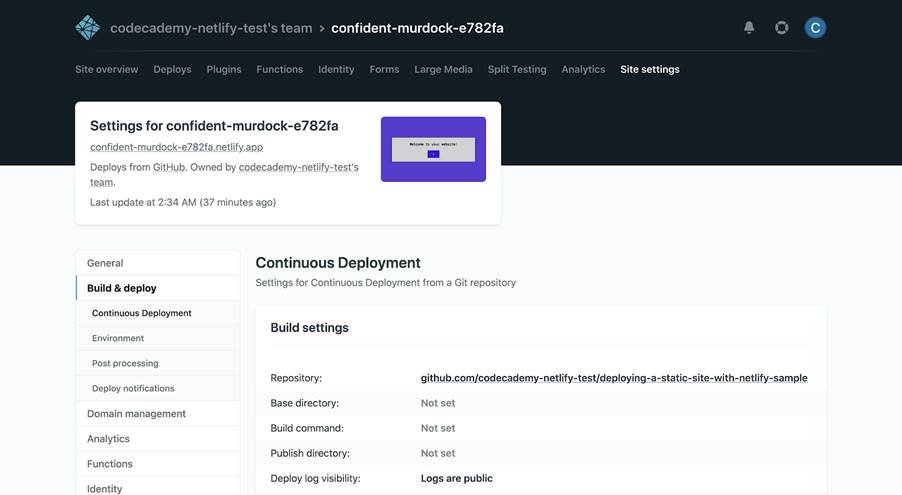
You’ll first notice a panel for “Build settings”. As touched upon before, many frontend frameworks like React and static site generators like Jekyll require special build commands that tell Netlify how to build your specific site. Build commands weren’t used in this case because it’s only a JavaScript, HTML, and CSS site without any frontend frameworks or static site generators.
Deploy notifications
While still in the Build & deploy tab on the left, jump down to the Deploy notifications section:

Here you can configure deploy notifications, which can inform you or external services about your site’s deploy activity. For example, the various types of Git notifications can do things like add a comment to your GitHub pull requests indicating the status of the associated deploy.
Note that some types of notifications are only available with paid Netlify plans.
Wrapping up
Congrats! You’ve just deployed your very own static site using Netlify, and you now know how to share your websites with the world. Specifically, you learned about:
- The use-case of static sites.
- Deploying a static site through Netlify’s GitHub integration.
- Analyzing the site logs and debugging “Failed” deployments.
- Using auto publishing to make changes to the site.
- Various site settings like build commands and deploy notifications.
Most importantly, notice how many configurations Netlify handled throughout the process — deploying an entire site only took a few clicks!
Although you’ve used Netlify to deploy a static site, there’s so much more that it can do! Features like pre-built forms, in-depth analytics, and built-in user authentication can take your websites even further.
Docker Compose Tutorial
Learn how to set up and manage multi-container Docker applications using Docker Compose, including configuring services, environment variables, and more.
Since 2013, Docker has been a game-changer for millions of developers, providing the ability to create independent and isolated environments for launching and deploying applications. If you’re new to Docker, you might want to start with our “What is Docker?” tutorial to grasp the basics.
Now, imagine managing a multi-container application with a single command—that’s the power of Docker Compose. Welcome to a world where setting up, running, and scaling complex applications is not just easier but more efficient.
In this tutorial, we’ll explore Docker Compose in depth. You’ll learn how it simplifies the process of defining, configuring, and running multi-container Docker applications. We’ll show you how it extends beyond running individual containers, even in detached mode, to offer a more robust solution for deploying and managing your applications.
Ready to revolutionize the way you work with containerized applications? Let’s dive into mastering Docker Compose!
Setting up Docker Compose locally
Whether you’re using Linux, Mac, or Windows, setting up Docker Compose locally is straightforward. It involves installing Docker Desktop on your system, similar to the Docker setup process. For detailed instructions, check out our guide on Setting up Docker.
Differences between Docker and Docker Compose
Docker and Docker Compose are both integral tools within the Docker ecosystem, but they serve distinct purposes and operate at different levels of abstraction.
Docker is a platform that enables the development, shipping, and running of applications in containers. It allows you to run applications isolated from each other on a single system. The key components of Docker include:
- Docker Images: These are templates that contain the application and all dependencies needed to run it.
- Dockerfile: This is a file created within your project containing a series of instructions and commands. It is used to build a Docker image, specifying what happens when someone creates a container using that image.
- Docker Containers: Containers are instances of Docker images. They are lightweight, standalone, and executable packages that include everything needed to run software—such as the code, runtime, libraries, and system tools. Each container operates independently, ensuring isolation from other containers.
Docker Compose is a tool specifically designed to manage and run multi-container Docker applications simultaneously. It relies on a YAML file to configure the application’s services, networks, and volumes. Where YAML is a human-readable data format used for configuration files. The key components of Docker Compose include:
- Docker Compose File: This YAML file, typically named docker-compose.yml, defines the services required to run your application. It includes configurations such as the image to use, environment variables, ports to expose, volumes to mount, and networks to connect to.
- Multi-Container Management: Docker Compose allows you to define and manage multiple interconnected services, simplifying the orchestration of complex applications that require several containers.
Essential commands to run Docker Compose
There are two main commands required to run and stop Docker Compose files:
- docker-compose up: This command starts and runs the containers defined in your Docker Compose file.
- docker-compose down: This command stops and removes the containers, networks, and volumes created by docker-compose up.
Before we dive into Docker Compose, let’s clear up a common doubt. However, the key to mastering Docker Compose lies in understanding how to build a Docker Compose file.
Docker Compose vs. Docker Detached Mode
If you’re not familiar with detached mode, it’s an option you can use with the docker run command to run containers in the background, freeing up the terminal for other commands:
docker run –detach (or -d) image_name
Copy to clipboard
While detached mode is useful, Docker Compose is preferred when managing complex, multi-container applications. Docker Compose allows you to define, configure, and run multiple interconnected containers as a single unit using a YAML file, which simplifies management and deployment.
Example:
Instead of running multiple detached containers like this:
docker run -d –name db postgres
docker run -d –name web -p 8000:8000 –link db myapp
Copy to clipboard
You can define a docker-compose.yml file:
version: ‘3’
services:
db:
image: postgres
web:
image: myapp
ports:
– “8000:8000”
depends_on:
– db
Copy to clipboard
And then simply run:
docker-compose up -d
Copy to clipboard
This launches both services in detached mode, with proper networking and dependency management. It also makes sharing your Docker setup easier, as users with limited Docker knowledge can set up the environment by running a single command.
In Summary:
- Detached Mode: Useful for running individual containers in the background.
- Docker Compose: Provides a more robust solution for managing complex, multi-container applications, with benefits like service dependency management, easier scaling, and simplified configuration through a single file.
How to create a Docker Compose file
In this section, we’ll learn how to create a Docker Compose file to set up a MySQL server. We’ll go through the process step by step:
- Create a New File: Open your preferred text editor and create a new file named docker-compose.yml in your project directory.
- Specify the Version: Start your file by specifying the Docker Compose version. For this project, we’ll use version 3:
version: ‘3’
Copy to clipboard
- Define the Services: Services are the core components that define your application’s container configuration. Each service typically represents a single container or a set of replicated containers. Under the version, define the MySQL service:
services:
db:
image: mysql:5.7
Copy to clipboard
- Set Environment Variables: Environment variables are used to pass configuration settings to containers. For the MySQL server, we’ll set the root password using an environment variable:
services:
db:
image: mysql:5.7
environment:
MYSQL_ROOT_PASSWORD: password
Copy to clipboard
- Configure Ports: To access MySQL from outside the container, map its port:
services:
db:
image: mysql:5.7
environment:
MYSQL_ROOT_PASSWORD: password
ports:
– “3306:3306”
Copy to clipboard
- Add a Volume for Data Persistence: Volumes in Docker are used to persist data generated by containers. Adding a volume ensures that your data remains even if the container is stopped or removed. Let’s add a volume to our configuration:
services:
db:
image: mysql:5.7
environment:
MYSQL_ROOT_PASSWORD: password
ports:
– “3306:3306”
volumes:
– mysql_data:/var/lib/mysql
volumes:
mysql_data:
Copy to clipboard
Here, mysql_data is the name of our volume, and /var/lib/mysql is the path inside the container where MySQL stores its data.
Your complete docker-compose.yml file should now look like this:
version: ‘3’
services:
db:
image: mysql:5.7
environment:
MYSQL_ROOT_PASSWORD: password
ports:
– “3306:3306”
volumes:
– mysql_data:/var/lib/mysql
volumes:
mysql_data:
Copy to clipboard
Running the Docker Compose file
Now that we’ve created our Docker Compose file, let’s run it:
- Open a terminal and navigate to the directory containing your docker-compose.yml file.
- Run the following command to start your MySQL server:
docker-compose up -d
Copy to clipboard
The -d flag runs the containers in detached mode, in the background.
- To stop the MySQL server and remove the containers, use:
docker-compose down
Copy to clipboard
Note: This won’t remove the persistent volume we created.
That’s it! You’ve successfully created and run a Docker Compose file for a MySQL server. You can extend this process to more complex setups with multiple services.
Conclusion
Congratulations on completing the Docker Compose tutorial! You’ve just taken a significant step in mastering Docker Compose, a powerful tool for managing multi-container Docker applications. In this tutorial, we’ve explored:
- The basics of Docker Compose and how it differs from Docker itself.
- How Docker Compose compares to the default Detached mode.
- How to create a Docker Compose file for a MySQL database service.
- The importance of services, environment variables, and volumes in Docker Compose.
- How to run and manage your Docker Compose setup.
Docker Networking
Docker networking is the backbone of container-based applications. Learn how to choose and configure different Docker network types—Bridge, Host, Overlay, IPvLAN, and Macvlan—to optimize performance, security, and scalability. From single-host environments to multi-host setups in Docker Swarm, we’ll cover best practices and troubleshooting tips so you can confidently set up and manage your own container networks.
Introduction to Docker Networking
Docker is a powerful platform that allows developers to automate the deployment of applications inside lightweight containers. If you’re completely new to Docker, check out our Initial Docker Tutorial for a quick introduction.
In this tutorial, you’ll learn:
- Why Docker networking is essential for containerized applications
- How different Docker network types (Bridge, Host, Overlay, IPvLAN, Macvlan) work and when to use each
- What best practices to follow for secure and efficient networking
- How to set up multi-host networking and troubleshoot common issues
Simply put, Docker networking provides the communication lanes for containers, whether they’re on the same host or spread across multiple hosts. Think of it like setting up racetracks for toy cars—each car (container) needs its own lane to move freely but still stay connected to the overall race (the application). By the end of this tutorial, you’ll be able to confidently set up and manage Docker networks for projects ranging from small single-host environments to large-scale deployments.
Types of Docker Networks
- Bridge Networks: The default network driver for Docker containers. Bridge networks allow containers on the same host to communicate, providing an isolated and secure network environment.
- Host Networks: Containers share the host’s network stack, improving performance by bypassing network translation but compromising network isolation.
- Overlay Networks: This type enables containers across multiple Docker hosts to communicate, ideal for clustered environments like Docker Swarm.
- IPvLAN Networks: This mode assigns IP addresses from the local LAN directly to containers, offering high performance and advanced IP management.
- Macvlan Networks: Containers are assigned a unique MAC address, making them appear as physical devices on the network. This is useful for legacy applications that require Layer 2 network access.
The choice of network type depends on the application’s isolation, performance, and scalability requirements. In this section, we’ll discuss choosing the Right Network type for your needs.
Choosing the Right Docker Network Type
Choosing the correct Docker network type is essential for optimizing performance and ensuring security. Below are the suitable use cases of the network types discussed above:
- Bridge Networks: Suitable for applications on a single host that require isolated container traffic. This network type is particularly useful for development and testing environments, where we want to ensure that your application behaves consistently without interference from other processes running on the host.
- Host Networks: Ideal for performance-critical applications that don’t require isolation. In this setup, the container shares the host’s network stack, which can lead to lower latency and higher throughput. This network type needs direct access to the host’s networking capabilities.
- Overlay Networks: Best for multi-host deployments like Docker Swarm or Kubernetes, ensuring seamless inter-host communication. This type of network is crucial for distributed applications, allowing for dynamic scaling and ensuring that containers can connect and communicate regardless of their physical location.
- IPvLAN Networks: This setup is perfect for users who need precise control over IP addressing in high-performance environments. It is beneficial for scenarios where you need fine-grained control over your network topology and IP allocation, making it ideal for service-oriented architectures or microservices.
- MacVLAN Networks: This type of network allows you to assign a unique MAC address to each container, making it appear as a physical device on the network. This is great for legacy systems requiring Layer 2 network access.
If none of the above network types suits your needs, you can select the “None” option to disable networking entirely. This is especially useful for tasks that don’t need external communication, such as compute-bound jobs. There’s a lighthearted saying in the DevOps world: “No networking is the best networking—so just use None.”
Here are a few extra tips for choosing the right network type:
- Use bridge networks for single-host container communication
- Choose host networks when you need maximum performance
- Go for overlay networks in multi-host scenarios
- Consider IPvLAN for fine-grained IP management
- Use MacVLAN when you need containers to appear as physical network devices
Setting up Docker Networking
In this section, we’ll walk through the practical steps of configuring Docker networking for your containerized applications. You’ll learn how to:
- Run containers on Docker’s default network
- Create a custom bridge network for improved isolation
- Connect multiple containers to the same network and verify their communication
By the end, you’ll have hands-on experience with the basics of Docker networking and be ready to implement more advanced configurations in your own projects.
Setting up Docker networking involves a few steps:
Prerequisites: Ensure Docker is installed on your system and create a project with a website and MySQL database containers. Here’s the Docker Setup tutorial to guide you through the setup process. Running Containers on Default Network: By default, Docker assigns containers to the bridge network. You can run your web application and database containers using the following commands:
docker run -d –name web-container my-web-app
docker run -d –name db-container mysql:latest
Copy to clipboard
The above commands demonstrate how to set up your containers in the default bridge network, enabling them to communicate with each other.
Creating a Custom Bridge Network: In some scenarios, you may need a custom network for better isolation or specific application requirements. You can create a custom bridge network using the command:
docker network create my-custom-network
After creating a custom network, you can connect your containers to it. Use the following commands to run your containers within the custom network:
docker run -d –name web-container –network my-custom-network my-web-app
docker run -d –name db-container –network my-custom-network mysql:latest
This ensures that both containers are part of the same custom network, allowing for improved communication and management.
To verify that your network has been set up correctly and to inspect the details of your custom network, use the command:
docker network inspect my-custom-network
Advanced Docker Networking Concepts
Network Mode Comparison: Bridge vs Host vs Macvlan
This command provides information about the network configuration, including the connected containers and their IP addresses.
| Bridge Mode | Host Mode | Macvlan Mode |
| Provides good isolation between containers | Offers better performance due to no network isolation | Containers appear as physical devices on the network |
| Allows fine-grained control over inter-container communication | Containers use the host’s network stack directly | Provides the best performance for network-intensive applications |
| Supports port mapping to expose services | Potential security risk due to reduced isolation | Requires more complex network configuration |
| Slightly higher overhead due to network address translation (NAT) | Useful for high-performance applications where isolation is less critical | Useful when containers need to be on the same network as physical devices |
Bridge Mode Setup
Bridge mode is the default network mode in Docker. Here’s how you can set it up:
- Create a custom bridge network:
docker network create –driver bridge bridge_network
- Run a container using this network:
docker run -d –name bridge_container –network bridge_network nginx
- Inspect the network:
docker network inspect bridge_network
- Connect two containers and test communication:
docker run -it –name test_container –network bridge_network busybox
ping bridge_container
Host Mode Setup
Host mode removes network isolation between the container and the Docker host. Here’s how you can set it up:
- Run a container in host mode:
docker run -d –name host_container –network host nginx
- Verify the container is using the host’s network:
docker exec host_container ip addr show
Note: You should see the same network interfaces as your host machine.
- Test by accessing the nginx default page:
curl http://localhost
Note: Be careful with host mode, as it can lead to port conflicts.
Macvlan Mode Setup
Macvlan allows you to assign a MAC address to a container, making it appear as a physical device on your network. Here’s how you can set up this mode:
- Identify the network interface on your host:
ip addr show
- Create a Macvlan network (replace eth0 with your network interface):
docker network create -d macvlan \
–subnet=192.168.1.0/24 \
–gateway=192.168.1.1 \
-o parent=eth0 my_macvlan_network
- Run a container using this network:
docker run -d –name macvlan_container –network my_macvlan_network nginx
- Inspect the container to see its IP address:
docker inspect macvlan_container | grep IPAddress
- Test network connectivity from another device on your network:
ping [container_ip_address]
Additional Setup Tips:
- For all modes, ensure your Docker daemon is running, and you have the necessary permissions.
- For Macvlan, your physical network must allow promiscuous mode on the interface.
- When using host mode, be aware of potential port conflicts with the host system.
- For bridge mode, you may need to configure port forwarding to access container services from outside the host.
Implementing Multi-Host Networking with Overlay Networks
In Docker Swarm, overlay networks allow communication across multiple Docker hosts. Docker Swarm is a tool that helps manage and coordinate multiple Docker containers across several computers or servers. For multi-host setups, overlay networks are the go-to solution. Here’s a detailed look at setting up and using overlay networks:
1. Initialize Docker Swarm
docker swarm init
Copy to clipboard
2. Create an Overlay Network
docker network create –driver overlay –attachable my-overlay-network
Copy to clipboard
3. Running Services on Different Hosts
# On host 1
docker service create –name service1 –network my-overlay-network nginx
# On host 2
docker service create –name service2 –network my-overlay-network redis
Copy to clipboard
4. Verify Connectivity
docker run –rm -it –network my-overlay-network nicolaka/netshoot ping service1
Copy to clipboard
Essential Docker Networking Commands
There are a few commands we will use frequently when working with Docker networks. Below are some of the most common ones:
| Commands | Use |
| docker network ls | List all Networks |
| docker network inspect my-custom-network | Inspect a network |
| docker network create –driver bridge my-new-network | Create a new network |
| docker network connect my-new-network container-name | Connect a container to a network |
| docker network prune | Remove unused networks |
| docker network disconnect my-new-network container-name | Disconnect a container from a network |
| docker network rm my-new-network | Remove a network |
Best Practices for Docker Networking
- Create Custom Bridge Networks: Set up separate bridge networks for each application or environment. This improves security by isolating containers from unrelated applications.
- Segment Your Networks: Organize your containers into different networks, such as frontend, backend, and database networks, to keep your application layers secure and separated.
- Use Overlay Networks for Multi-Host Deployments: If you’re running containers across multiple hosts or using Docker Swarm, overlay networks allow containers on different hosts to communicate easily.
- Limit Container Exposure: Only expose the ports that your containers need to communicate with the outside world, reducing the risk of unauthorized access.
- Use Docker’s Built-in DNS for Service Discovery: Instead of using fixed IP addresses, Docker’s DNS makes it easier for containers to find and communicate with each other automatically.
Troubleshooting Docker Networking Issues
Container cannot connect to the internet:
- Check if the container is connected to the correct network
- Verify DNS settings in the container
- Ensure the host has internet connectivity
Containers cannot communicate with each other:
- Confirm they are on the same network
- Check if you’re using container names for communication
- Verify network driver compatibility
Port conflicts:
- Use docker port to check port mappings
- Ensure the host port is not already in use
- Consider using dynamic port assignment
Overlay network issues:
- Verify Swarm mode is active
- Check firewall settings between hosts
- Ensure the overlay network is properly created and attached
Performance issues:
- Monitor network usage with docker stats
- Consider using host or Macvlan networking for high-performance requirements
- Check for network bottlenecks on the host
Conclusion
Setting up Docker networking is key to ensuring your containers can communicate effectively. By using custom networks and understanding the various networking modes, you can maintain better isolation, scalability, and control over your container interactions—especially important for complex or multi-host applications.
As you continue to explore Docker, remember that networking is at the heart of modern, distributed application architectures. Keep experimenting with different network types, topologies, and tools to find the best solution for your specific needs.
Docker VS Kubernetes
Explore the essential roles Docker and Kubernetes play in modern application deployment.
In the world of containerization, Docker and Kubernetes are two powerful tools that have shaped the way applications are deployed and managed. Docker simplifies the creation and deployment of containers, while Kubernetes provides advanced orchestration for managing them at scale. In this tutorial, we’ll dive into the core differences between Docker and Kubernetes, helping you choose the right tool based on your needs. We’ll also discuss how they can work together to enhance your development and production workflows.
Choosing the right tool for your project can significantly impact the efficiency of your development and operational processes. This Docker vs. Kubernetes comparison will help you understand the key differences between these technologies. By understanding these distinctions, you’ll be better equipped to make informed decisions for both small and large-scale projects.
What is Docker?
Docker is a platform designed to simplify the creation, deployment, and execution of applications. It allows developers to package their applications with all dependencies, ensuring consistent performance across different environments.
For a deeper dive, check out our What is Docker tutorial series.
What are the Core Components of Docker?
- Docker Image: A lightweight, standalone, and executable package that includes everything needed to run a piece of software.
- Docker Registry: A storage and distribution system for Docker images, allowing users to push and pull images to and from centralized or private repositories.
- Docker Engine: The runtime environment that powers Docker containers.
- Docker Hub: A public registry where developers can find, share, and store Docker container images.
- Docker Compose: A tool for defining and running multi-container applications.
For detailed guides, refer to our previous tutorials on Docker Engine, Docker Hub, and Docker Compose.
What is Kubernetes?
Kubernetes is an open-source container orchestration system that automates the deployment, scaling, and management of containerized applications. It takes container management a step further by providing tools for scaling and handling complex applications in distributed systems.
What are the Core Components of Kubernetes?
Kubernetes is a powerful system that automates the deployment, scaling, and management of containerized applications. At the heart of this tool are several key components that work together to ensure that applications run reliably and efficiently. Understanding these core components is crucial to grasping how Kubernetes manages workloads across clusters.
Here are the main components of Kubernetes:
- Pods: The smallest deployable units that contain one or more containers. A Pod represents a single instance of a running process in your cluster. They encapsulate application containers, storage resources, a unique network IP, and options that govern how the container(s) should run.
- Nodes: Machines (virtual or physical) that run Kubernetes-managed containers. Each node contains the services necessary to run pods and is managed by the control plane. Nodes are the worker machines in a Kubernetes cluster.
- Clusters: A group of nodes managed as a single unit. Clusters allow Kubernetes to distribute work across multiple machines, increasing availability and scalability for applications.
- Control Plane: This is the brain of Kubernetes, responsible for maintaining the desired state of the cluster. It manages cluster-wide decisions (e.g., scheduling) and detects and responds to cluster events. The control plane includes components like the API server, scheduler, and controller manager.
- Services: An abstraction that defines a logical set of Pods and a policy to access them. Services enable network access to a set of Pods, allowing for load balancing and service discovery within the cluster.
- Deployments: Provide declarative updates for Pods and ReplicaSets. A ReplicaSet ensures that a specified number of identical Pods are running at any given time. Deployments allow you to describe an application’s life cycle, such as which images to use, the number of Pods to run, and the way to update them.
While brief, these components are key to Kubernetes’ ability to orchestrate containers at scale.
Key Differences
Let’s explore the Docker and Kubernetes comparison across several key parameters:
| Parameters | Docker | Kubernetes |
| Architecture | Operates on a single-node architecture, running all containers on one host managed by a Docker daemon (background process). Simpler but limited to the host’s resources. | Manages multi-node clusters, distributing containers across several machines. Uses a control plane and worker nodes, offering better scalability and complex deployments. |
| Functionality | Focuses on container creation and management at the host level. Manages tasks like container images, networking, and storage on a single machine. | Focuses on orchestrating, scaling, and managing containers across clusters. Handles tasks like container distribution, high availability, and automated rollouts. |
| Scalability | Scales using Docker Swarm for basic clustering and load balancing but lacks advanced scaling features for complex apps. | Offers powerful scaling with horizontal pod scaling, cluster autoscaling, and load balancing for large-scale applications and zero-downtime deployments. |
| Complexity | Easier to set up and manage. Ideal for smaller projects or development environments. Simpler architecture with fewer components and an intuitive CLI. | Requires more setup effort and has a steeper learning curve. Best for large-scale systems needing advanced orchestration across multiple servers. |
Pros and Cons of Docker and Kubernetes
Docker
Pros:
- Easy to use and set up with minimal configuration.
- Fast container deployment for quickly building, testing, and running apps.
- Ideal for isolated environments and smaller projects.
Cons:
- Limited management capabilities compared to Kubernetes.
- Lacks advanced features for automatic scaling and self-healing across distributed systems.
- Not suited for managing complex, multi-container applications across multiple hosts.
Kubernetes
Pros:
- Provides robust management for distributed applications.
- Offers load balancing, service discovery, and automated rollouts.
- Scales efficiently for large systems, handling thousands of containers across multiple hosts.
Cons:
- Steeper learning curve due to many concepts and components.
- Requires complex setup and maintenance.
- Often needs dedicated personnel for production-level cluster management.
Which One Should You Choose?
Choosing Docker
Docker shines in scenarios such as building or testing an app on your own machine, within a small team, or for apps that don’t require multiple servers or complex orchestration. It’s also a great starting point for quick, lightweight containerization, especially if you’re new to the container world.
Choosing Kubernetes
Kubernetes is the go-to solution for more complex needs, especially for apps running across multiple servers or those that need to handle large amounts of traffic. Kubernetes excels at managing and coordinating multiple services, ensuring that your app can grow seamlessly without downtime.
Decision Factors
When choosing between Docker and Kubernetes, consider your team’s expertise, project complexity, and scalability needs. Docker might be enough for smaller projects or teams new to containerization. However, as your application grows in complexity or scale, Kubernetes becomes increasingly valuable. Additionally, consider your infrastructure requirements, deployment strategies, and long-term growth plans.
Conclusion
Docker and Kubernetes are two foundational tools in the world of containerization, each serving unique purposes. Docker simplifies container creation and deployment, making it ideal for smaller projects or simpler environments. On the other hand, Kubernetes provides advanced orchestration and management capabilities for large-scale, distributed applications.
Choosing between Docker and Kubernetes depends on the complexity of your project, your scaling needs, and your team’s expertise. Both tools can also complement each other, with Docker providing the containers and Kubernetes managing them at scale.
By understanding their strengths and weaknesses, you’ll be able to make informed decisions that best suit your development and operational goals.
Going Beyond with Netlify
Explore even more features that Netlify offers beyond deployment.
This article presumes knowledge of Netlify and continuous deployment. Follow the steps in “Getting Started with Netlify” and “Deploying a Static Site with Netlify” to prepare for this article or get a refresher.
Going beyond
In this article, you will explore and discover some other key Netlify features that can take your sites to the next level! Although the free account comes with many great perks, Netlify has so much more to offer.
Custom domains and HTTPS
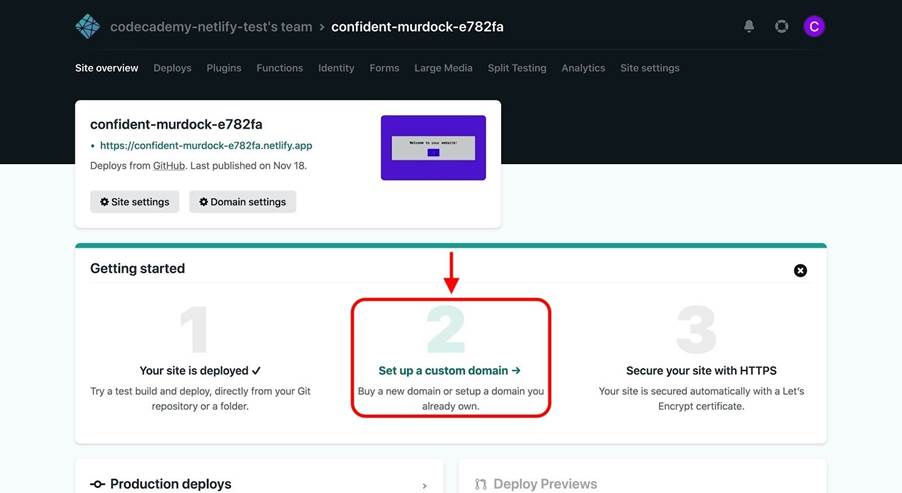
Netlify generates a default URL for each site, which is great for deploying minimum viable products and proofs of concept. However, you can take your site one step further by adding a custom domain and configuring HTTPS.
To do so, navigate to your site’s dashboard and click Set up a custom domain:
You’ll then be asked to enter your custom domain, but first, note the following:
- If you purchase a domain from Netlify, your site’s DNS will automatically be configured.
- If you purchase a domain from any other source (e.g., NameCheap) and don’t want to use Netlify DNS, you’ll need to configure your external DNS provider to point your domain to Netlify.
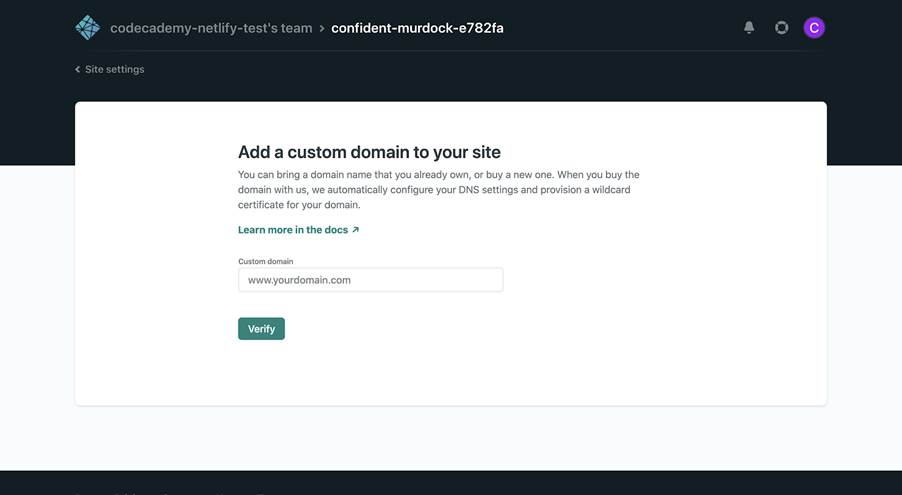
Click Verify, and if successful, you’ll be asked if you’re the owner of the domain.
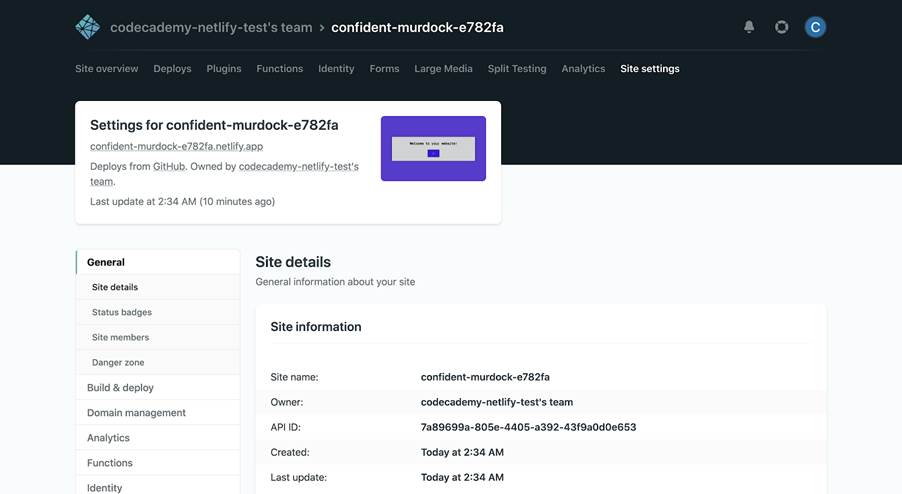
After adding your domain, you’ll be directed to the “Custom domains” panel in the Site settings tab:

Here you can configure your site’s various domains and even add multiple custom domains.
Next, click the HTTPS tab on the left. If you correctly configured your site’s DNS, it should automatically be secured with a Let’s Encrypt certificate, like so:

Notice that the panel says “Your site has HTTPS enabled”.
If you run into any problems with setting up your site’s DNS or HTTPS, check out Netlify’s troubleshooting documentation for more guidance.
Build plugins
Netlify’s Build Plugins enable you to add powerful capabilities to your site builds through a directory of community plugins or by creating your own.
To access these plugins, go to the Plugins tab of your site’s dashboard:

Here you can view a list of plugins created by developers at Netlify and community members. You can install a plugin by clicking the Install button next to the specific plugin that you want to install. Note that the Options dropdown next to each plugin contains a link to its documentation, npm package profile, and issue tracker.
If you wish, you can even create your own plugins!
Identity
Using Netlify’s Identity service, you can easily manage signups, logins, password recovery, and more without implementing your own authentication functionality.
Head over to the Identity tab of your site’s dashboard:

To get started, click Enable Identity and then you’ll see an Identity dashboard for your site:

You can access the various Identity settings for your site by clicking Settings and usage. There are a lot of interesting and useful features like the Netlify Identity widget, which enables users to register for your site. You can even invite users to register!
Premium capabilities
With the paid Netlify plans, you can unlock even more capabilities like:
- A team audit log that keeps track of actions made by team members, so you know what changes were made, when, and by whom.
- The ability to prioritize time-sensitive builds, which enables you to build and deploy your site as soon as possible.
- Increased bandwidth and build minutes so that you can scale up your site.
- Netlify Analytics, a service that provides data captured by Netlify servers (e.g., pageviews) through convenient charts so that you can easily analyze your site’s trends.
- Password protection to hide all or part of your site behind a password that you control.
Wrapping up
While we’ve shown you how to deploy a static site with Netlify, there are so many other ways to do this — Netlify just makes this process much easier.
For your inspiration, check out these case studies on how Netlify has enabled numerous companies to get a site up and running in no time.
Now it’s your turn to build a site of your own and share it with the world through Netlify. We can’t wait to see what you make!
How To Create a Free AWS Account
Explore AWS with a Free Tier account!
In this tutorial, we will explain how to create an AWS Free Tier account. The sign-up process involves the following:
- Creating a root user account
- Selecting an account type
- Payment, billing, and identity verification
- Choosing a plan
- Multi-Factor Authentication (MFA)
A fear many people have about using AWS is the cost. While some users may pay for AWS services, with careful use, it can be completely free. In addition, if a small number of resources are used for paid features, it can cost as little as a few dollars a month.
In AWS, there is only one account owner (root user). Additional users that are created by the root user are known as IAM users. IAM users can be configured as “admins” and be given the ability to create other IAM users. The root user is given full access to resources in the AWS account, while IAM users are granted permissions that are set in place by the root user. In addition, the root user’s sign-in credentials can be used for account recovery and other administrative functions.
Step 1: Creating An AWS Account
Let’s get started by creating the root user account.
- Let’s visit the AWS homepage.
- Upon clicking the button, “Create an AWS Account,” you will be prompted for an email address and a name that will be used to create the root user (this can be changed in the future).
- Next, we’ll select “Verify email address.” A verification code that’s sent to your email address will need to be entered, then we can select the “Verify” button. After creating your password, we can select “Continue.”
Note: You can click on the images in this tutorial to view them at a larger size.
Selecting Account Type
Now we need to select the account type. There are two types of accounts: business and personal. Although they’re functionally the same, it is best practice to use a personal account for learning and development, and a business account for work or professional purposes.
- For this article, we will be creating a personal account by selecting the “Personal – for your own projects” radio button.
- After this, a phone number, country/region, and address are required for validation purposes.
- Finally, we’ll mark the checkbox to indicate that we have read and agreed to the terms of the AWS customer agreement and then select “Continue (step 2 of 5).”

Payment, Billing, and Identity
The next step asks for a credit card, but no charge will be taken from you upon entering this information. If your account usage stays below the AWS Free Tier limits, you should be free from any payments. More detailed pricing information can be found through each AWS Free Tier feature page under “Pricing.”
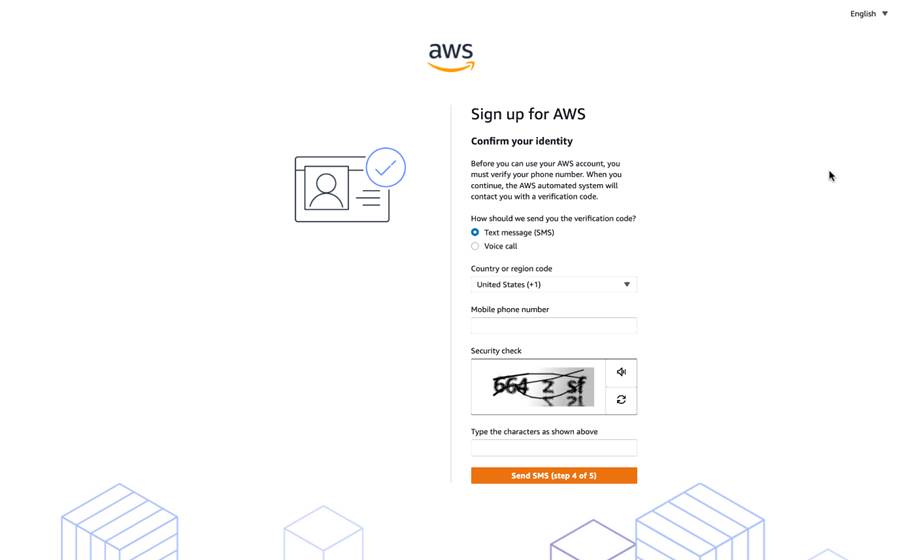
The next step is to confirm your identity using a verification code.
- You can do this through text message or a voice call to receive the code — whichever is best for you.
- We’ll enter that code into the captcha text box, select “Verify Code,” and once verified we can select “Continue.”
Selecting a Plan
AWS provides different plans with additional services like 24/7 support, best practice advisors, and additional guidance. With each higher-tiered plan, there are more services and additional costs.
On the next page, you can select a support plan for your business or personal account. There are five support plans available. For this article, we will be choosing the “Basic support – Free” plan. You can learn more about the different plans and features available by navigating to the Compare Support Plans page.
- We will choose a plan by marking the corresponding radio button.
- Then, we’ll select “Complete sign up” to finish.
- Amazing! You just finished setting up your AWS basic account. You should see a message from AWS that says your account is being activated, after which you will get an email once that is complete.
Multi-Factor Authentication
Multi-Factor Authentication (MFA) provides an additional layer of protection on top of your username and password.
MFA Set Up
Let’s set up Multi-Factor Authentication (MFA).
When we first log in to our AWS account using root user credentials, we’re brought to the console home. Here, we can see recently visited services, supplementary learning material, and other service-related information.
- From the console page, we will navigate to the dropdown menu in the header where your account name is, and choose “Security credentials.”
- Next, we’ll select “Multi-factor authentication (MFA)”, then “Activate MFA.”
- For this tutorial, we’ll choose “Virtual MFA device” from the list of options, and select “Continue.” However, you can choose another option if it suits you better. Make sure to keep the generated QR code up for the following three steps.
- Now, we’ll choose a preferred supported virtual authenticator application. If you don’t have one yet, you’ll need to download and set up an account for one.
- On the authenticator app, we’ll add a new app.
- Then, we’ll select “Scan a QR code” and scan the QR code on your screen.
- In AWS, let’s enter the two consecutive MFA codes into the fields available. If all steps were done correctly, you should get a message that says you successfully assigned virtual MFA.
When logged in to the AWS Console with MFA enabled, you will be prompted for your username and password (the first factor is what you know) and for an authentication code from your AWS MFA device (the second factor is what you have):
Together, these two factors boost security for your AWS account settings and resources. You can enable MFA for your AWS account and for individual IAM users you have under your account. MFA can also be used to control access to AWS service APIs.
Conclusion
Congratulations! You have successfully created your AWS Free Tier account and learned how to set it up with some basic services and features. Let’s summarize what we’ve learned and accomplished in this article. In this tutorial, we signed up for an AWS account by:
- Creating a root user
- Set up payment information and billing
- Selected the free-tier AWS support plan
- Set up MFA for account security
How to get certified cloud security professional (CCSP) certification
Discover ways to master the Certified Cloud Security Professional (CCSP) certification. Learn about the prerequisites of CCSP certification, the exam structure, study tips, and benefits to boost a career in cloud security.
The CCSP (Certified Cloud Security Professional) is a globally recognized certification for cloud security professionals. This article covers CCSP certification, its value, and how to prepare for the exam. With cloud security becoming a top priority for organizations, the CCSP certification is an essential credential for IT professionals seeking to advance their careers in cybersecurity. Embark on this journey and explore how obtaining the CCSP can open new career opportunities.
What is a CCSP certification?
The CCSP certification is offered by (ISC)², which validates your expertise in cloud security and demonstrates that you can secure critical data in cloud environments. As more organizations migrate to the cloud, the demand for cloud security experts has surged. This credential is ideal for IT and cybersecurity professionals who wish to specialize in protecting cloud-based infrastructures and data. We’ll see why certification is becoming popular among cloud enthusiasts and cover the importance of this certification in the coming phases.
What are the prerequisites of CCSP certification?
To qualify for the CCSP certification, you must meet specific work experience requirements set by (ISC)²:
- Five years of cumulative, paid work experience in information technology.
- Three of those years must be specifically in information security.
- At least one year should be in one or more of the six CCSP domains.
Can we still obtain CCSP certification without experience?
Yes, if you do not yet meet the full experience requirements, you can still pass the CCSP exam and become an Associate of ISC². As an Associate, you have up to six years to gain the necessary work experience to upgrade to full CCSP status.
Domains that CCSP certification covers
The CCSP certification covers six key domains: Cloud Architecture and Design: This domain examines how to design and deploy secure cloud solutions, including understanding different cloud service models and architectures.
- Cloud Data Security: Here, the focus is on protecting data both in transit and at rest, using encryption, access controls, and data loss prevention techniques.
- Cloud Platform & Infrastructure Security: This area looks at securing the underlying cloud platforms and infrastructure, ensuring that the systems supporting cloud operations are robust and well-protected.
- Cloud Application Security: This involves securing cloud-based applications by identifying and mitigating vulnerabilities that could be exploited in a cloud environment.
- Cloud Security Operations: This domain addresses the strategies for monitoring, incident response, and the overall operational management of cloud security.
- Legal, Risk, and Compliance: In this area, the emphasis is on understanding the legal, regulatory, and risk management aspects that impact cloud security.
Now that we understand the CCSP certification and its offerings, let’s examine the structure of this exam next.
CCSP exam structure
The CCSP exam evaluates knowledge across six key domains of cloud security. Below are the essential details regarding the exam structure, format, and requirements:
1. Exam Format
| Parameter | Value |
| Number of Questions | 125 |
| Question Type | Multiple-choice |
| Duration | 4 hours |
| Passing Score | 700 out of 1000 |
| Exam Mode | Computer-based (administered at Pearson VUE test centers) |
2. Exam Domains and Weightage
| Domain | Weightage |
| Cloud Concepts, Architecture, and Design | 17% |
| Cloud Data Security | 20% |
| Cloud Platform & Infrastructure Security | 17% |
| Cloud Application Security | 17% |
| Cloud Security Operations | 16% |
| Legal, Risk, and Compliance | 13% |
3. Scoring and Results
| Parameter | Details |
| Scoring System | Scaled scoring system |
| Minimum Passing Score | 700 out of 1000 |
| Results Timing | Provided immediately upon exam completion |
4. Exam Registration and Availability
| Parameter | Details |
| Where to Take the Exam | Pearson VUE test centers (in-person and online proctored options available) |
| Registration Fee | $599 |
| Official Registration Link | (ISC)² Website |
5. Retake Policy
| Attempt | Waiting Period |
| First Attempt (if unsuccessful) | 30 days |
| Second Attempt | 60 days |
| Third and Subsequent Attempts | 90 days |
| Maximum Attempts | Up to 4 times within a 12-month period |
Now that we have a clear grasp of the exam format, which topics carry the most weight, and how scoring works, the next step will be to create a focused study plan that can boost our chances of passing, let’s get into it.
Preparing for the CCSP exam
Preparing for the CCSP exam can feel overwhelming, but with a well-structured plan, it transforms into an engaging learning journey. Start by leveraging official (ISC)² practice tests and prep courses to familiarize yourself with the exam format. Engaging with study groups or online forums like the Codecademy community can also provide valuable insights and motivation.
A balanced approach is key—set a realistic study schedule, mark a tentative exam date as a milestone, and integrate hands-on practice alongside theoretical learning. Applying concepts in real-world scenarios not only reinforces your understanding but also boosts your confidence in tackling cloud security challenges. By combining structured study, peer support, and practical application, you can build a solid foundation that prepares you for both the exam and a successful career in cloud security.
Let’s explore the benefits and career impact of earning the CCSP certification.
Jobs that hire for CCSP
Earning your CCSP certification opens doors to a dynamic job market, with demand spanning tech startups, finance, healthcare, and government. Organizations seek experts to design and manage secure cloud environments, making CCSP-certified professionals essential in protecting sensitive data and shaping cloud security strategies.
Many companies seek professionals for key roles in cloud security. Here are some of the top positions and their primary responsibilities:
- Cloud Security Engineer: Focuses on evaluating and implementing cloud security controls, ensuring that the infrastructure and data are protected from threats.
- Cloud Architect: Designs secure cloud solutions by developing robust architectures, incorporating strategies like network segmentation and encryption, and setting up secure access policies.
- Information Security Manager: Oversees the overall security posture by managing regulatory compliance, continuously monitoring for vulnerabilities, and guiding strategic security initiatives.
Still weighing your options? Let’s compare the CCSP with other popular security certifications.
CCSP certification vs other certifications
When you’re planning your certification path, it’s crucial to understand how the CCSP compares with other prominent credentials in the field of cybersecurity. While many certifications offer valuable insights into security practices, each has its own focus and depth. Let’s delve into how the CCSP stands in relation to the CISSP and CCSK, helping you decide which aligns best with your career goals.
CCSP vs CISSP
The CISSP (Certified Information Systems Security Professional) is one of the most well-known and comprehensive certifications in the cybersecurity world. It covers a broad spectrum of security topics—from risk management and security architecture to network security and asset protection. This wide-ranging approach benefits professionals who need a holistic understanding of cybersecurity across various environments.
In contrast, the CCSP narrows its focus exclusively to cloud security. As cloud computing becomes an integral part of business strategy, the demand for experts who can navigate the complexities of securing cloud infrastructures is growing rapidly. The CCSP delves deep into the principles and best practices specifically tailored to cloud environments, addressing issues such as cloud architecture, data security in the cloud, and compliance challenges unique to cloud-based solutions.
For professionals whose primary interest lies in securing cloud platforms, the CCSP offers specialized training that can provide a competitive edge in an increasingly cloud-centric world. While the CISSP remains an excellent credential for those who seek a comprehensive overview of cybersecurity, the CCSP’s focused curriculum is particularly valuable if your career objectives are geared toward mastering the nuances of cloud security.
CCSP vs CCSK
The CCSK (Certificate of Cloud Security Knowledge) is another credential that serves as a stepping stone into the world of cloud security. It provides a solid foundation in cloud security principles, offering an introductory understanding of the challenges and best practices associated with securing cloud environments. CCSK is often considered a good starting point for professionals new to cloud security, as it covers key topics without requiring extensive prior experience.
On the other hand, the CCSP is designed for individuals who have already established a certain level of expertise in the field. It builds upon the foundational knowledge that a CCSK provides and demands a higher degree of practical experience. With the CCSP, you’re expected to demonstrate a deeper understanding of advanced cloud security challenges and solutions. The exam covers more complex scenarios, such as securing hybrid cloud environments and managing sophisticated cloud architectures, which require theoretical knowledge and practical insights from real-world experience.
In essence, while the CCSK is an excellent entry point for those beginning their journey in cloud security, the CCSP represents a more advanced credential. If you’re looking to progress beyond the basics and establish yourself as a seasoned cloud security expert, pursuing the CCSP is a natural next step. It signals to employers that you have a robust and comprehensive skill set tailored to the demands of securing modern cloud environments.
By comparing the CCSP with the CISSP and CCSK, you can better gauge which certification aligns with your career aspirations. If you’re aiming for a broad understanding of cybersecurity, the CISSP might be your choice. However, if your goal is to specialize and excel in cloud security, the CCSP meets and exceeds the requirements, preparing you for the unique challenges of today’s cloud-driven landscape.
Conclusion
In summary, the CCSP certification is an asset for cybersecurity professionals specializing in cloud security. In this article, we covered the prerequisites, exam structure, preparation strategies, and the significant career benefits associated with earning the CCSP.
Next steps:
- Follow a structured skill path tailored for the CCSP exam.
- Explore additional security courses and specializations available from reputable online learning platforms.
- Set a realistic study schedule and register for the CCSP exam.
Setting up Docker
Learn how to setup Docker on your local system
In today’s development environment, containerization has become an essential practice for developers and IT professionals. Docker, one of the leading containerization platforms, allows us to automate the deployment of applications inside lightweight, portable, and self-sufficient containers. This technology not only simplifies the process of managing application dependencies and packages but also ensures that your application works cross-platform.
In this tutorial, we will guide you through the step-by-step process of setting up Docker on your system. Whether you are a new developer looking to learn about Docker or a seasoned one, this tutorial will guide you through the setup process for the following operating systems:
- Mac
- Windows
- Linux
Docker setup for Mac
To set up Docker in MacOS, open the official Docker website to download the Docker desktop. Once the download is completed, install it on your Mac system.

Once the installation is done, run the Docker desktop and open your terminal. In the terminal run the command docker –version to see the current version of Docker. Run docker run hello-world to confirm containers are working.
Docker setup for Windows
In Windows, the procedure for setting up Docker is the following:
- You will have to make sure Windows features required to run Docker are enabled. To turn these on search Turn Windows features on or off and open it.
- Once it is open, select the options called Hyper-V and Windows Subsystem for Linux
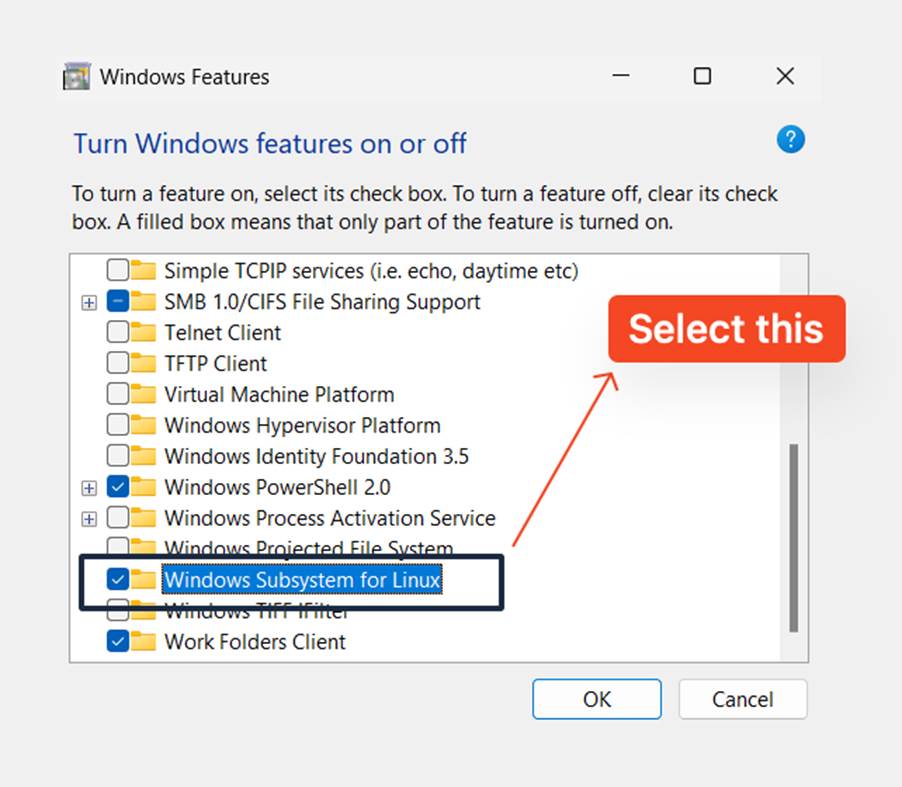
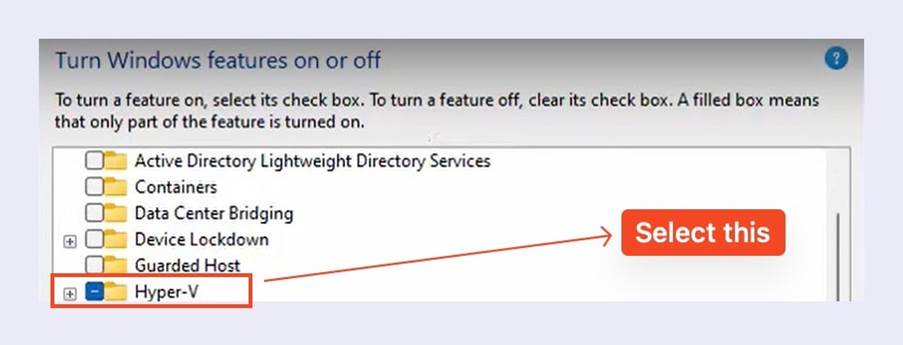
- Press OK to restart your system.
- Once this is done, download the Docker desktop from Docker website and install it.
- After installation, if your PC doesn’t have WSL enabled, you will get an error message like this:
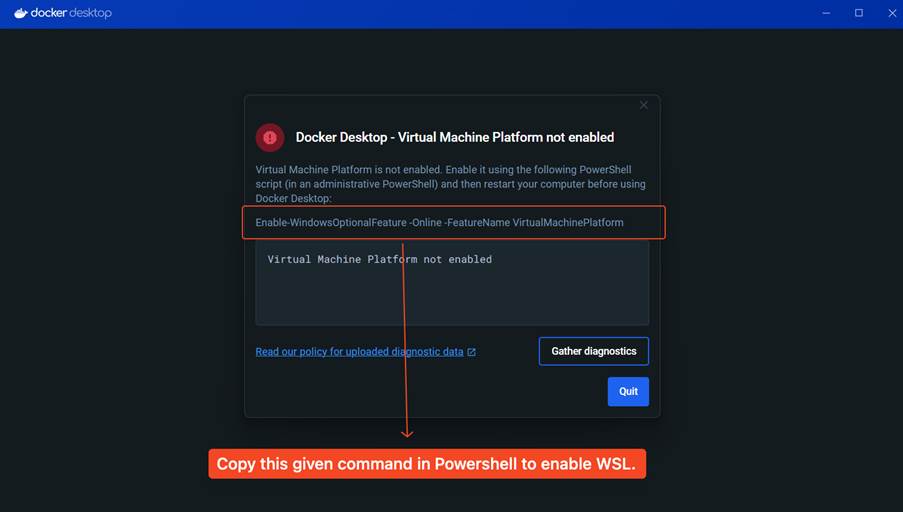
- To fix the problem, you must copy the given command in the error message and paste it inside PowerShell. Make sure to run PowerShell as administrator. Once you run the command, your system will restart.
- With this, the installation of Docker is done. To confirm it is working run the following two commands:


Docker setup for Linux
When it comes to Linux, you must be careful as Docker only supports Ubuntu, Debian, Red Hat Enterprise Linux (RHEL), and Fedora. You can follow the steps below to setup Docker on Linux:
Checking the KVM Virtualization Support
- To load the module, run:
modprobe kvm
Copy to clipboard
- Depending on your CPU, the next command will differ:
modprobe kvm_intel # Intel processors
modprobe kvm_amd # AMD processors
Copy to clipboard
- To check if the KVM module is working, run the Command:
lsmod | grep kvm
Copy to clipboard
The following steps require you to set up KVM device user permissions:
- You will have to check the ownership of /dev/kvm and to do that, run:
ls -al /dev/kvm
Copy to clipboard
- The next step requires you to add your user name, $USER, to the kvm group:
sudo usermod -aG kvm $USER
Copy to clipboard
You are done with checking the KVM. Now we will move to setting up the Docker Desktop.
Setting up the Docker Desktop in Linux
- First, you need to update your package database. To do that, run:
sudo apt get-update
Copy to clipboard
- Install the Docker engine like so:
sudo apt install docker.io
Copy to clipboard
- Once the above installation is done, you need to enable the docker services. To do that, run the following commands:
sudo systemctl enable docker
Copy to clipboard
To confirm that the docker services are running, run the command:
sudo systemctl status
Copy to clipboard
Note: If the services are not running, run the command:
sudo systemctl start docker
Copy to clipboard
- Finally, to check if Docker is running, run a Docker container like so:
sudo docker run hello-world
Copy to clipboard
- You should get a response like this:

Conclusion
Congratulations! In this article, we’ve walked through setting up a Docker container for Mac, Windows, and Linux—the first step towards mastering Docker. With Docker, you’re now equipped to create consistent and isolated environments for your applications, making development, testing, and deployment more efficient and reliable.
Using Docker and Kubernetes Together
Learn how to use Docker and Kubernetes together in this hands-on tutorial. We’ll guide you through deploying the classic 2048 game, from local development to scalable production. Perfect for developers ready to level up their containerization and orchestration skills.
Docker and Kubernetes are often considered separate tools, but using them together forms a powerful combination for developing, deploying, and scaling applications. Docker simplifies container creation and management, while Kubernetes automates the orchestration of these containers across distributed systems. In this tutorial, we’ll explore leveraging Docker and Kubernetes to deploy the classic 2048 game. By the end, you’ll understand how to use Docker for local development and Kubernetes to manage and scale your applications in production.
Step-by-Step Guide: Deploying the 2048 Game with Docker and Kubernetes
Now that we understand the power of Docker and Kubernetes working together, let’s dive into the actual process of deploying the 2048 game. We’ll begin by pulling the game’s Docker image, testing it locally, and then setting up a Kubernetes deployment to bring it to life in a scalable environment. Follow the steps below to experience firsthand how these tools come together to manage and deploy your application efficiently.
Step 1: Pull the Game
First, let’s pull the 2048 game from Docker Hub:
docker pull alexwhen/docker-2048
Think of it as downloading the game cartridge for your Kubernetes arcade machine!
Step 2: Testing the Game Locally
Let’s test-drive the game before we deploy it. This will make sure everything’s in top shape before we publish it to the world:
docker run -d -p 8080:80 –name 2048-game alexwhen/docker-2048
Now, fire up your browser and head over to http://localhost:8080 to get your game running!
Step 3: Creating the Kubernetes Deployment
It’s time to create a Kubernetes deployment! First, we need a 2048-deployment.yaml file to tell Kubernetes how to deploy our game.
- Choose a working directory: On your local machine, create or navigate to a directory where you’ll store the Kubernetes deployment files:
mkdir 2048-game-kubernetes
cd 2048-game-kubernetes
- Create the YAML file: In this directory, create the file 2048-deployment.yaml. You can use any text editor:
vim 2048-deployment.yaml
- Paste the Deployment Configuration: Copy the following YAML configuration into the file. This configuration defines how Kubernetes will deploy your game, including details like the number of replicas and the container image to use.
apiVersion: apps/v1
kind: Deployment
metadata:
name: game-2048
spec:
replicas: 3
selector:
matchLabels:
app: game-2048
template:
metadata:
labels:
app: game-2048
spec:
containers:
– name: game-2048
image: alexwhen/docker-2048
ports:
– containerPort: 80
- Save and exit.
Step 4: Create the Kubernetes Service
In this step, you’ll create a Kubernetes service to expose the deployed 2048 game.
- Create a new file: Similar to Step 3, create a new file named 2048-service.yaml in the same working directory.
- Paste the service configuration: Copy and paste this YAML configuration:
apiVersion: v1
kind: Service
metadata:
name: game-2048-service
spec:
selector:
app: game-2048
type: LoadBalancer
ports:
– protocol: TCP
port: 80
targetPort: 80
- Save and exit.
Step 5: Deploy the Game to Kubernetes
Now, let’s deploy the game to Kubernetes:
- Apply the deployment:
kubectl apply -f 2048-deployment.yaml
- Apply the service YAML:
kubectl apply -f 2048-service.yaml
Step 6: Verify the Deployment
Check if the deployment was successful:
- Check the deployment status:
kubectl get deployments
- Check the pods:
kubectl get pods
Copy to clipboard
- Check the service:
kubectl get services
At this point, you’ve successfully deployed the game! Kubernetes is now running your game in multiple pods, and the service is set up to make it accessible to users.
Step 7: Access the Game
Now for the exciting part—playing the game! How you access the game depends on whether you’re using Minikube or a cloud provider.
For Minikube users
Use this command to directly access the game service through Minikube:
minikube service game-2048-service
This will open your default browser and take you to the 2048 game running on your local Kubernetes cluster.
For cloud provider users (like AWS, GCP, or Azure):
- Run this command to get the external IP address of the game-2048-service:
kubectl get services game-2048-service
- Copy the external IP address and open it in your browser:
http://<external-ip>
Step 8: Improve Your Game (Scaling)
To scale up the number of game instances, follow these steps:
- Scale the deployment:
kubectl scale deployment game-2048 –replicas=5
- Verify the new pod count:
kubectl get pods
Conclusion
Congratulations! You have successfully deployed the classic 2048 game by leveraging Docker and Kubernetes together. Throughout this tutorial, you learned how to pull the game image, run it locally, create the necessary Kubernetes deployment and service, and even scale the game to handle more players. By mastering these skills, you can now apply your knowledge to deploy and manage other applications in a cloud-native environment, harnessing the power of containerization and orchestration for real-world projects. Keep experimenting and building on your Kubernetes expertise!
What is a Docker Container – A Complete Guide
Learn what Docker files, images, and containers are and how to create them.
In today’s development landscape, the ability to deploy projects efficiently and make them accessible for collaboration significantly enhances their potential for growth. Docker revolutionizes project sharing and setup by allowing developers to create images, push them to repositories, and enable quick access for other developers. Setting up becomes a breeze—just run a few commands, and you’re good to go.
Before we dive into Docker image creation, let’s discuss some essential Docker commands.
Note: If you want to learn what Docker is and how to set up Docker locally, read these articles: What is Docker and How to Set Up Docker.
Essential Docker Commands
Docker has many commands, but as developers, we only need a few that we will use repeatedly. While Docker has a long list of commands, in this tutorial, we will focus on a few basic ones.
The basics of Docker are divided into the following three parts:
- Docker file
- Docker Image
- Containers
These are some common Docker commands that you will be using while working on your projects. Let’s first look at some basic commands in Docker:
- Docker build command
This command creates a Docker image by using the Docker file.
docker build dockerFile_path
- Docker pull command
This command is used to pull images from the Docker Hub.
docker pull image_name
- Docker run command
Helps us run the image file and create the containers. Later, we will discuss what -it and -d does.
docker run –it –d container_id/name
- Docker ps command
Lists all the running containers.
docker ps
- Docker image ls command
List all the images.
docker image ls
- Docker stop command
Stop the running container.
docker stop container_id/name
- Docker exec command
Executes a running container.
docker exec container_id/name
- Docker kill command
Kills a running container. We usually use docker kill when a container is taking too much time to close.
docker kill container_id/name
Docker push command
This command will push the image to the Docker Hub.
docker push username/image_name
How to create a Docker file
A Docker file is a simple text file that contains instructions for creating an image file. The following is how we can create a Docker file for a Python project:
- Create a new folder wherever you want to learn Docker, and there all the files related to Docker will be created.
- In the project folder create a new file and name it “dockerfile”. For this tutorial, we’ll use the BMI calculator coded in Python to create the Docker image.
- We start a Dockerfile by specifying the base image. For a Python project, use:
FROM python
This line tells Docker to use the official Python image as the starting point for our container and this will provide a pre-configured environment with Python already installed.
If we need a specific Python version, we can specify it like this:
FROM python:3.9
This ensures our project runs on a particular Python version, which can be important for compatibility and reproducibility.
To see the supported versions, you can check out Docker Hub.
- Create a working directory for our image. This will make our Dockerfile more organized, readable, and maintainable.
FROM python
WORKDIR /myapp
Note: If we don’t create a WORKDIR in your Dockerfile, all commands will execute in the container’s root directory (/) by default.
- We can copy local files into the container’s working directory using the COPY command:
FROM python
WORKDIR /myapp
COPY . /myapp
The use of the dot is to copy all files from our local directory into the “/myapp” directory in the container.
Alternatively, we can specify individual files or directories:
COPY requirements.txt /app/
COPY src/ /app/src/
Using COPY ensures that our application files are available inside the container at the specified location.
- Add the CMD instruction to specify the command that runs when the container starts:
FROM python
WORKDIR /myapp
COPY . /myapp
CMD [“python3”, “myapp.py”]
This tells Docker to execute your Python script when the container launches.
The difference between CMD and RUN:
- CMD: Runs when you start the container. Use it for the main command that your application needs to run.
- RUN: Executes during the image build process. Use it for setup tasks like installing dependencies:
RUN pip install -r requirements.txt
RUN commands modify the image, while CMD sets the default command for running the container.
How to create a Docker image
A Docker image is a file with all the dependencies and libraries required to run the program. Here are different ways to create an image from the Dockerfile:
- Create an image without giving it a name or tag:
docker build .
If the Dockerfile is in a different directory, specify the path:
docker build /path/to/dockerfile/directory
For example, if our Dockerfile is in a directory named “demo”:
docker build ./demo
- Verify the image creation:
docker image ls
This command lists all images present in our system. Our recently created image will be shown at the top.
- Create a named image with a specific tag:
You must have noticed the Repository and Tag columns in the docker image ls output:
- The Repository column shows the image name
- The Tag column indicates the image version
This is how you can add a name and a version to our Docker image:
docker build -t pythoncode:01 .
This format creates an image named “pythoncode” with the tag “01”.
Here’s an improved version of the note on Docker tagging and versioning:
Note: Docker tags and versioning enable running multiple versions of an application simultaneously in separate containers. To create and manage versions:
- Pull an existing image or create a new one.
- Make desired changes to the image or its underlying application.
- Build a new image with a unique tag (e.g., myapp:v1.2.3).
- Repeat steps 2-3 for each new version.
This approach allows developers to:
- Test multiple versions of a project concurrently
- Easily switch between versions
- Maintain a clear history of application changes
- Ensure reproducibility across different environments
Example workflow:
docker pull myapp:latest
# Make changes to the application
docker build -t myapp:v1.0.0 .
# Make more changes
docker build -t myapp:v1.1.0 .
You can then run different versions side by side:
docker run -d myapp:v1.0.0
docker run -d myapp:v1.1.0
How to create Docker Containers
Containers are instances of Docker images. After creating an image, the next step is to run containers from it. Here’s how to do it effectively:
- List available images:
docker image ls
- Create an interactive container:
For projects requiring user interaction, use the -it flags:
docker run -it image_name:tag
Our current requires user interaction to calculate the BMI, so we’ll use this command:
docker run -it pythonapp:01
The following are key options when running containers:
Detached mode (-d): Run containers in the background and helps us run multiple containers at once:
docker run -d image_name:tag
Port mapping (-p): Map host ports to container ports for network access, enabling us to access the containerized application as if it were running directly on our host machine:
docker run -d -p host_port:container_port image_name:tag
Example: docker run -d -p 3001:3000 myapp:latest
This maps:
Host machine (localhost:3001) <—–> Container (container_ip:3000)
Auto-remove (–rm): Automatically remove the container when it exits:
docker run -d –rm -p 3000:3000 image_name:tag
Custom naming (–name): Assign a custom name to the container:
docker run -d –rm –name “my_custom_name” -p 3000:3000 image_name:tag
Combining the above options for a full example:
docker run -d –rm –name “web_app” -p 3001:3000 myapp:v1.2.3
This command:
- Runs a detached container (-d)
- Auto-removes it when stopped (–rm)
- Names it “web_app”
- Maps port 3001 on the host to 3000 in the container
- Uses the image “myapp” with tag “v1.2.3”
Conclusion
Docker is an amazing tool for running applications seamlessly on your system using Docker containers, whether it’s your application or someone else’s. It helps you set up the dependencies, libraries, and files in your system and run as many versions of it as you want. In this tutorial, we covered:
- What are Docker files and how to create them based on our project.
- What images are and how to create our own image file.
- What containers are and where to use which instructions.
What Is AWS?
Why AWS may or may not be a good fit for your business.

In this article, we will learn the following:
- What is AWS?
- Why cloud computing?
- What makes AWS unique?
- What are the strengths of AWS?
- What are the weaknesses of AWS?
What is AWS?
You may be familiar with the terms “the cloud” or “cloud storage.” You’ve certainly already used an app or service that’s built using the cloud, and likely even AWS. But what is AWS?
AWS stands for Amazon Web Services. As the name implies, it’s Amazon’s cloud services platform. You can learn more about cloud platforms in our Foundations of Cloud Computing course.
As a cloud platform, AWS provides one of the world’s most comprehensive, broadly adopted cloud services. Just for context, AWS is utilized by millions of clients, including startups, large companies, and government agencies. It provides a wide array of different offerings, in the form of services, to its clients. Let’s go over some of these offerings:
- AWS offers IT infrastructure services to clients as web services (hence the “Web Services” in its name).
- These services can be accessed over the Internet.
- AWS uses a pay-as-you-go model to help clients save money, time, and human resources.
We will take a more in-depth look at these services further on in this article. Now that we have a basic understanding of what AWS is, let’s discuss cloud computing in more detail and why it’s so useful. Then, we will discuss what makes AWS so unique, and its strengths and weaknesses.
Why Cloud Computing?
Earlier, we talked about AWS being a cloud platform. What does this mean exactly?
Well, cloud computing is the delivery of computing services over the internet by a cloud provider. These services range from databases to networking to data storage.
Today, many applications are based on cloud computing. For example, if you’ve streamed media, it is very likely that the service you streamed from is using cloud computing.
So why would a streaming service use a cloud platform? Let’s explore what the cloud has to offer different businesses.
Storage
Today, businesses collect a lot of data and need to find somewhere to store all of it. They can’t just store it in cabinets or disks anymore.
The cloud provides companies with vast amounts of storage capacity. This is more than enough to solve their data storage problem.
Analytics
A lot of data handling done by businesses is performed on raw data. This raw data is hard to interpret and needs to be processed into information in order for it to make sense.
Processing large amounts of raw data can be costly in resources and time. A business can delegate that job to a cloud provider. Cloud providers can easily process large amounts of raw data in their data centers.
Infrastructure
Cloud providers like AWS possess massive data centers. These centers house enough servers to provide millions of organizations with different services. You may be wondering, why don’t the businesses just own the servers themselves?
Well, imagine your company provides a streaming service. Owning all the servers necessary to keep your application running costs a lot of time, money, and work.
Because of this, many businesses choose cloud providers like AWS which have a great amount of computing power available. With this computing power, they can offer infrastructure at a much more affordable price than if a business hosted its own servers.
So, now we know how organizations can benefit from the cloud generally, but what makes AWS unique?
What Makes AWS Unique?
Now that we’ve discussed the benefits of cloud infrastructure in general, let’s revisit the AWS offerings again. AWS offers a wide array of IT infrastructure services to its clients. But, what are those services?
Well, AWS has over 200 fully-featured services as of March 2022. These services fall into several categories. The different categories include:
- Machine Learning
- Internet of Things (IoT)
- Management & Governance
- Migration and Transfer
- Mobile
- Networking and Content
- Delivery
- Robotics
- Storage
- Security, Identity, and Compliance
- Satellite
- Game Development
And this list continues to grow. Let’s delve a little deeper into some of the popular AWS services and what they do.
Amazon EC2 (Elastic Compute Cloud)
Amazon EC2 is a cloud platform service provided by Amazon that offers scalable, secure computing capacity. It allows you to set up easy access to developers for cloud computing for the web and gives you full control of your computing resources. [aws-ec2-image]
Amazon Lambda
Amazon Lambda lets you run your code without needing to own a server. You can execute code for any application or backend service without any administration needed. It scales precisely and can be extensively available. [aws-lambda-image]
Amazon S3 (Simple Storage Service)
Amazon S3 is a service that provides great scalability, makes object storage easier, offers data availability, performance and security. Businesses can store massive amounts of data easily with this service.
Amazon Cloudfront
Amazon Cloudfront is a content delivery network (CDN) platform that runs at fast speeds, distributes data, APIs, apps, and videos on a large scale securely, and connects seamlessly with the other AWS services.
Amazon RDS (Relational Database Services)
Amazon Relational Database Service (Amazon RDS) is a service that simplifies database management, configuration, and scaling on a cloud platform. It allows you to automate various database management tasks like database arrangement, backups, patching, and hardware provisioning in a cost-effective manner that can be scaled to fit your needs. [amazon-rds-image]
Awesome! We learned a lot about AWS and cloud computing so far. Now, let’s discuss some of the strengths of AWS.
What are the Strengths of AWS?
We’ve learned a lot so far about the list of different offerings and services from AWS. Now let’s go over the strengths of AWS.
- AWS has a large volume of services. With the ability to architect using this many services to choose from, the sky’s the limit.
- AWS is the most established provider. It was one of the first cloud services, started around 2006, and is a market leader.
- AWS has a strong free tier of services.
AWS provides many benefits to businesses, but it’s not the perfect solution.
What are the Weaknesses of AWS?
- Pricing complexity: AWS offers multiple plans each with its own features. This makes it difficult to estimate the total cost of services due to the number of options and tiers affecting the cost.
- Lock-in: Getting our applications out of AWS may require extra effort. This can make us “locked in” to using only AWS services. This problem is known as vendor lock-in.
While AWS is the current market leader, other cloud platforms, including Microsoft Azure and Google Cloud Platform, provide strong competition.
Conclusion
Congratulations! You learned a lot about AWS.
In this article, we learned more about the cloud, how it’s beneficial for businesses, and why businesses can benefit from moving from their infrastructure to the cloud.
We also discussed what AWS offers as a cloud services provider, its services, strengths, and weaknesses.
What is Cloud Computing Architecture?
Learn cloud computing architecture fundamentals, key components, and best practices. Explore its real-world examples from AWS, Azure, and Google Cloud to design scalable, secure solutions.
Introduction
Ever wonder how companies like Netflix and Amazon manage to deliver smooth, uninterrupted experiences to millions of users simultaneously? The magic lies in their cloud computing architecture, a well-structured system designed to optimize resources, reduce costs, and maximize flexibility.
At its core, cloud computing architecture is all about efficiency. It ensures businesses can scale operations, improve agility, and adapt to evolving technological demands. Industry leaders like AWS and Microsoft Azure continuously emphasize the importance of solid cloud architecture, as it plays a crucial role in business agility, operational excellence, and cost efficiency.
Key components of cloud computing architecture
Cloud computing architecture consists of two primary sections: the front end (what users interact with) and the back end (where complex tasks like processing, data storage, and management happen behind the scenes). Let’s break them down clearly.
Front-end

The front end is the visible interface through which users interact directly with the cloud environment. This layer acts as the gateway, allowing users to seamlessly access cloud-based services without understanding the underlying infrastructure.
The front end is what users interact with. It includes:
- Web apps (websites accessible on browsers like Chrome, Firefox, and Safari)
- Mobile applications (such as cloud storage apps like Google Drive or Dropbox)
- Desktop clients (like Microsoft OneDrive or Adobe Creative Cloud)
The front end is designed for usability, ensuring that individuals and businesses can easily upload, retrieve, and manage data without complications.
Back-end
The backend is the powerhouse of cloud computing. It includes servers, databases, storage systems, and applications that store, process, and deliver data. This infrastructure is critical for cloud functionality even though users don’t see it.
The backend also has different components inside it. Let’s understand these components one by one in detail:
Application
Applications in the backend can be software or platforms that process client requests and deliver the necessary outcomes to end-users. The specific application selected depends heavily on client requirements and resource availability. Depending on business needs, these applications can include software as a service (SaaS) solution, development platforms (PaaS), or even full-fledged infrastructure services (IaaS).
Service
Services play a pivotal role in cloud architecture by providing essential utilities. Commonly used services include storage, application development environments, and web services, ensuring functionality and utility across various user applications.
The services layer also provides essential cloud functionalities such as:
- Storage services (e.g., AWS S3, Google Cloud Storage)
- Compute services (e.g., AWS EC2, Google Compute Engine)
- Database services (e.g., Amazon RDS, Microsoft Azure SQL)
- AI & ML services (e.g., Google AI Platform, AWS SageMaker)
These services form the foundation of cloud computing, enabling automation, scalability, and reliability.
Storage
Cloud storage systems manage and safeguard digital assets, including files, images, videos, and structured databases.
Popular cloud storage solutions include:
- Amazon S3: A scalable object storage service
- Microsoft Azure Storage: Includes blob storage, table storage, and file shares
- Google Cloud Storage: Offers high-performance and durable storage for various workloads
Each provider tailors its storage solutions to cater to different use cases, from big data analytics to AI-driven applications.
Management
The management component allocates specific resources for tasks and coordinates multiple functions simultaneously within the cloud environment. It effectively manages various components, such as applications, tasks, services, security, data storage, and infrastructure, ensuring seamless operational coordination.
Security
With cyber threats constantly evolving, security is a top priority in cloud computing. The security layer ensures:
- Secure authentication & identity management (e.g., AWS IAM, Azure Active Directory)
- Data encryption for sensitive information
- Firewall protection & threat detection to mitigate cyberattacks
- Disaster recovery & backup mechanisms for data resilience
Security isn’t just an add-on, it’s deeply integrated into the architecture to protect user data and infrastructure from vulnerabilities.
How to design a clean cloud architecture?

A well-designed cloud architecture follows four key principles to ensure high performance, security, and cost-effectiveness.
Scalability and flexibility
A Cloud solution is expected to adapt to fluctuating workloads quickly. Scalability ensures that resources can be scaled up or down based on demand, preventing resource wastage and performance bottlenecks. Here are the two common ways in which scaling is usually done:
- Vertical scaling (Scaling Up): Upgrading existing servers with more power
- Horizontal scaling (Scaling Out): Adding more servers to distribute the load
Security
A robust security framework is critical. Cloud architectures should incorporate encryption, identity management, secure network protocols, and rigorous access controls to protect sensitive data and resources from cyber threats.
Cost-efficiency
Optimizing resource utilization directly impacts cost efficiency. Techniques like:
- Auto-scaling: Adjusting compute power dynamically
- Reserved instances: Prepaying for discounted cloud capacity
- Serverless computing: Only paying for resources when they are actively used
Performance and reliability
Ensuring consistent high availability and quick responsiveness is essential. Architectures should include redundancy, disaster recovery strategies, and continuous monitoring to maintain system reliability and optimal performance.
Companies like IBM stress the significance of balancing these considerations, warning that neglecting any single area can lead to operational inefficiencies and vulnerabilities.
Real-world Examples of Cloud Architecture
Examining real-world examples provides valuable insights into effective cloud architecture:
AWS cloud architecture
AWS emphasizes flexibility and security, offering the AWS Well-Architected framework. This framework outlines best practices in operational excellence, security, reliability, performance efficiency, and cost optimization, assisting companies in creating robust, secure, and scalable solutions.
Microsoft Azure Cloud Architecture
Azure focuses on seamless hybrid solutions that integrate on-premises and cloud-based environments. It provides extensive examples that demonstrate how companies can efficiently manage complex, distributed environments.
Google Cloud architecture
Google Cloud prioritizes scalability, analytics capabilities, and robust security measures. Its architecture is designed to handle extensive data processing needs, particularly in analytics and machine learning applications, demonstrating high efficiency and flexibility.
Platforms such as Infosec Institute and Coursera provide comprehensive case studies, enabling learners to see practical applications of theoretical knowledge and the impact of architectural choices on performance, cost, and security.
Best practices for cloud architecture design
For successful cloud architecture design, stick with the following design practices:
Regularly update & optimize
Be informed about evolving technologies, adopting new tools and methodologies that enhance performance, security, and operational efficiency.
Conduct risk and performance assessments
Regular assessments identify potential vulnerabilities or bottlenecks. Conducting extensive performance testing ensures systems can handle anticipated workloads and rapidly changing demands.
Automation tools
Implementing automation reduces human error, accelerates deployments, and simplifies maintenance tasks. Tools such as Infrastructure as Code (IaC) frameworks (Terraform, CloudFormation) are critical in automating cloud infrastructure management.
Cloud giants like AWS and Cisco regularly advocate these practices, noting their importance in maintaining secure, scalable, and efficient cloud environments.
Conclusion
In this tutorial, we’ve explored the foundational aspects of cloud computing architecture, covering key components, the utility of visual diagrams, essential design considerations, and best practices. These principles provide a solid foundation for designing and managing effective cloud environments.
Recommended Next Steps:
- Consider enrolling in professional certifications like SAA-C03: AWS Certified Solutions Architect or AZ-900: Microsoft Azure Fundamentals. But before taking these tests, you can prepare for them with our AWS and Azure course, which will increase your chances of clearing the test in less tries.
- Further, explore documentation available through AWS Architecture Center, Microsoft Azure Architecture Center, and Google Cloud Architecture Framework.
What is Docker?
Introduction to Docker
In this tutorial, we’ll discuss what Docker is and why it is used by developers worldwide.
When a developer tries to set up or share a project, one of the biggest challenges is managing the dependencies and different software versions the project requires. Consider the following situation: We are working on a software project and we wish to share the code files with another developer, named Bob, for review, testing, and debugging. We may have certain packages and libraries already installed on our computer that Bob may not. When trying to share the project, because Bob doesn’t have the same packages installed, he has to install them to avoid running into any issues. Docker solves this problem by allowing us to send a clone of our machine, including all installed libraries and frameworks, thereby allowing Bob to skip having to install the libraries on his machine and proceed with working with the code.
Docker, created by Docker, Inc. in 2013, helped millions of developers worldwide in creating independent and isolated environments to launch and deploy their applications. These environments are called containers. After Docker was created, developers were able to use the following quote: “If it works on my machine, it will work everywhere.”
How does Docker work?
Docker works by creating an image file of a project, which later helps us run multiple independent and isolated containers simultaneously. An isolated container means if something happens to one container, it won’t affect the others. Because of this, we can run multiple versions of the same application at once on a single PC.
The image files are created using a file called a “Dockerfile.” A Docker file is a script containing instructions on building a Docker image. Each instruction in the Docker file adds a layer to the image, allowing us to define the operating system, install necessary software packages, copy project files, and set up the application environment.
By following the instructions in the Dockerfile, Docker builds an image that encapsulates all the dependencies and configurations our project needs. This image can then be used to launch containers, ensuring that our application runs consistently across different environments.
A common misconception about Docker
There’s a misconception about Docker: it is very similar to a virtual machine. Docker is not a virtual machine (VM). While both Docker containers and virtual machines serve to isolate applications, they operate in fundamentally different ways.
To learn more about this, check out the table below:
| Docker Containers | Virtual Machines |
| – Running multiple containers on a local system has a low impact on the OS. It uses a small amount of disk space and is fast. | – VMs have a high impact on the local system as they will consume more RAM and disk space, making the system slow if we run multiple VMs at once. |
| – Sharing, destroying, and creating a Docker container is extremely easy as it encapsulates everything needed to run an application, including the code, runtime, libraries, and dependencies, ensuring consistency across different environments. | – Sharing, destroying, and creating a VM can be challenging as it requires managing and maintaining a full operating system, allocating significant resources, and dealing with complex setup and configuration processes. |
| – Docker containers encapsulate apps instead of full machines, meaning all necessary parts of an application including its code, libraries, and dependencies, are loaded into a single container. | – VMs encapsulate a whole machine. This includes the entire operating system and application and its dependencies. |
Docker Architecture
Docker architecture consists of several components that work together to facilitate the creation, deployment, and management of containers. These key components include:
- Docker Engine
- Docker Images
- Docker Containers
- Docker Registries
Docker Engine
The Docker engine is the most important component of Docker, also responsible for running the containers. A Docker engine consists of:
- Docker Daemon: Manages objects like images, containers, networks, and volumes.
- Docker Client: The Command line interface (CLI) that helps the user to interact with Docker and its components. Commands like Docker run, Docker build, Docker pull, and Docker push are sent from the Docker Client to the Docker Daemon.
- REST API: Provides a way to communicate with Docker Daemon.
Docker Images
Docker images are templates used to create containers. These images contain the application along with all the necessary dependencies and packages required for it to run. A Docker image packages everything the application needs into a single, portable unit, ensuring consistency across different environments.
Docker Containers
Docker containers are instances of a Docker image. They contain the application and its dependencies, providing a constant environment for running the application across different systems. It’s also important to understand the cycle of a Docker container:
- Create: A container is created from a Docker image.
- Start: The container is started, running the specified command or application.
- Stop: The container is stopped, pausing the application.
- Restart: The container is restarted.
- Pause/Unpause: The container’s processes are paused or resumed.
- Destroy: The container is removed from the system.
Docker Registries
Docker Registries are repositories for storing and distributing Docker images. They allow users to share images within an organization or publicly. The Docker registry is divided into two parts:
- Docker Hub: Docker Hub is the default public registry provided by Docker. It hosts a vast collection of official and community-contributed images.
- Private repositories: Users can also set up private repositories which can only be accessed by people who have permission to access the repository. Usually, organizations choose this repository to keep their data safe.
Conclusion
We have covered the basics of what Docker is. You should now be familiar with basic Docker concepts such as Docker architecture, Docker Images, Docker Engines, and Docker containers. Docker is an important tool used by developers to deploy, ship, test, and manage their projects. Docker has made the life of a developer much easier and is also very efficient to use.
What is Kubernetes
Learn Kubernetes, its key features, architecture, and why it’s essential for scalability and automation.
Introduction to Kubernetes
Kubernetes has become an industry favorite for managing containerized applications at scale. If you’ve worked with Docker, you already know how containerization simplifies development and deployment by bundling your application’s code and dependencies into portable units. Kubernetes takes this capability to the next level, orchestrating these containers across multiple machines to ensure high availability, scalability, and efficient resource usage.
Now, let’s dive deeper into Kubernetes and why it’s a game-changer for managing containerized applications.
What is Kubernetes?
Kubernetes (often called “K8s”) is an open-source container orchestration platform originally developed by Google and now maintained by the Cloud Native Computing Foundation (CNCF). It automates many of the manual processes involved in deploying, scaling, and managing containerized applications, enabling efficient operation and management of complex application architectures.
Key Features of Kubernetes
- Automated Container Scheduling: Decides which servers (nodes) will run our container-based applications.
- Self-Healing: Automatically restarts containers that fail, replaces containers, and kills containers that don’t respond to health checks.
- Horizontal Scaling: Scales applications up or down by adding or removing container replicas, ensuring consistent performance under varying loads.
Service Discovery & Load Balancing: This provides stable IP addresses and DNS names for our services, automatically distributing traffic across replicas to balance the load.
Whether we’re running a single microservice or a complex ecosystem of interdependent services, Kubernetes ensures our application remains highly available and can adapt to changing traffic demands.
Why do we need Kubernetes?
While Docker makes it straightforward to package and run applications in containers, managing large numbers of containers across multiple hosts can quickly become overwhelming. Here’s where Kubernetes is helpful:
- Scalability: As our application grows, Kubernetes makes it easy to replicate containers to handle increased traffic.
- High Availability: Kubernetes automatically detects and replaces failing containers, minimizing downtime and ensuring continuous availability.
- Efficient Resource Utilization: By intelligently scheduling Pods on available nodes, Kubernetes helps make the best use of underlying CPU and memory.
- Declarative Configuration: We define the desired state of our apps in YAML or JSON manifests, and Kubernetes continuously works to maintain that state.
- Extensibility: Kubernetes has a rich ecosystem of plugins and add-ons (monitoring, logging, service mesh, etc.), enabling us to extend its capabilities as our needs evolve.
In short, Kubernetes solves the challenges of container orchestration, letting us focus on building great applications instead of wrangling infrastructure details.
Kubernetes vs Docker
When it comes to containerization, Docker is often the first tool that comes to mind. It enables us to package applications and their dependencies into portable containers. However, once we start running containers at scale, we need a more comprehensive system to schedule, maintain, and orchestrate those containers across multiple machines—this is where Kubernetes steps in.
- Docker: Handles the creation and management of containers on a single host, making it simple to package and run applications in isolated environments.
- Kubernetes: An orchestration platform that manages how and where those containers run in a cluster of hosts, ensuring scalability, reliability, and efficient resource usage.
For a thorough comparison of these two technologies—including use cases, pros and cons, and how they work together—check out our dedicated tutorial on this topic.
Understanding Kubernetes Architecture
At a high level, a Kubernetes cluster comprises two primary layers:
- Control Plane: Functions as the “brain” of Kubernetes, responsible for making decisions about scheduling, detecting, and responding to cluster events and maintaining the desired state of the cluster.
- Worker Nodes: Physical or virtual machines that run our containerized applications (Pods). Each worker node contains the necessary services to communicate with the Control Plane and manage workloads.
Core Control Plane Components
- API Server: The front-end interface to the Kubernetes control plane. All cluster interactions happen via REST calls to the API server.
- Scheduler: Decides which node should run newly created Pods based on resource requirements, policies, and node availability.
- Controller Manager: Manages multiple controllers that handle routine tasks (e.g., ensuring the correct number of replicas for a Deployment).
- etcd (Data Store): A distributed key-value store that keeps all cluster data, including configuration and state.
Worker Node Components
- Kubelet: The agent running on each node, responsible for starting and stopping containers (via container runtimes like Docker or containerd).
- Kube-Proxy: Handles network routing, ensuring each node can communicate with Services across the cluster.
- Container Runtime: The software (Docker, containerd, CRI-O, etc.) that actually runs and manages containers.
Key Components in Kubernetes
Kubernetes provides several core building blocks to help us create and manage containerized applications. Below are some of the most popular Kubernetes objects and resources.
Pods
A Pod is the smallest deployable unit in Kubernetes. Each Pod:
- Contains one or more closely related containers (e.g., an app and its logging sidecar)
- Share storage and network resources
- Has a unique IP address in the cluster, making inter-pod communication seamless
Why Pods?
- Pods encapsulate the container runtime needs, ensuring any containers within them share the same context (IP, namespace, volumes).
- When we scale our application, Kubernetes typically replicates Pods, not individual containers.
Services & Ingress
Services provide a stable network endpoint (IP and DNS name) to a set of Pods. Even as individual Pods are added or removed, the Service’s virtual IP remains the same. This simplifies how other services or external clients find our application.
Common Service types:
- ClusterIP (default): Accessible only within the cluster.
- NodePort: Exposes the service on a static port on each node.
- LoadBalancer: Integrates with cloud providers to provision an external load balancer.
Ingress manages external (HTTP/HTTPS) traffic to our Services:
- Instead of creating multiple LoadBalancers, we can route different paths or hostnames to various Services via a single Ingress resource.
- Often coupled with an Ingress Controller (e.g., NGINX, Traefik) that implements these routing rules.
For example, you might have:
- Host-based rule: All traffic to api.example.com goes to the “api-service” in the cluster.
- Path-based rule: Requests to example.com/blog go to the “blog-service,” while requests to example.com/shop go to the “shop-service.”
Config Maps
A ConfigMap allows us to separate configuration data (plain text files, environment variables, command-line arguments) from container images. This pattern:
- Promotes the 12-factor principle of strict separation of config from code.
- Simplifies updates to application settings without rebuilding container images.
For example, if our application needs a special configuration file, we can store it in a ConfigMap and mount it into the Pod at runtime.
Secrets
Secrets securely store confidential data such as passwords, API tokens, or SSH keys. They work like ConfigMaps but with added security. Secrets:
- Can be mounted as files or exposed as environment variables in Pods.
- Are base64-encoded and can be encrypted at rest (depending on cluster configuration).
- Should be restricted with appropriate Role-Based Access Control (RBAC) settings.
Volumes
While containers are temporary, Volumes offer a way to persist or share data. Kubernetes supports various types:
- emptyDir: Temporary storage for a Pod’s lifetime.
- hostPath: Maps a directory on the node’s filesystem into the Pod.
- PersistentVolume (PV) and PersistentVolumeClaim (PVC): Abstract storage so we can request persistent storage without worrying about underlying details.
- Cloud Storage Integrations (e.g., AWS EBS, GCE Persistent Disk, NFS): For production workloads requiring stable, networked storage.
Deployments
A Deployment is a higher-level abstraction that:
- Manages ReplicaSets, ensuring the desired number of Pod replicas are running.
- Facilitates rolling updates and rollbacks.
- Tracks revisions, letting us revert to previous versions if necessary.
Use Case: We might define a Deployment for our web application, specifying the container image, the number of replicas, and an update strategy (e.g., a rolling update with zero downtime).
StatefulSets
For applications requiring persistent identity or stable network identifiers—like databases or distributed systems—StatefulSets are essential. Unlike Deployments, StatefulSets:
- Maintain a persistent state and a unique network identity for each Pod (e.g., pod-0, pod-1).
- Use stable, unique Pod hostnames.
- Work closely with persistent volumes for reliable data storage.
Example: If we’re running Kafka, Cassandra, or MongoDB clusters, StatefulSets ensure that each node is uniquely addressable and data is not lost when Pods move.
Conclusion
Kubernetes is not just a tool for running containers; it is a comprehensive platform that integrates automation, scalability, and resilience. Whether we are working with microservices or traditional applications, Kubernetes manages the orchestration details, ensuring our containers operate efficiently across our infrastructure.
